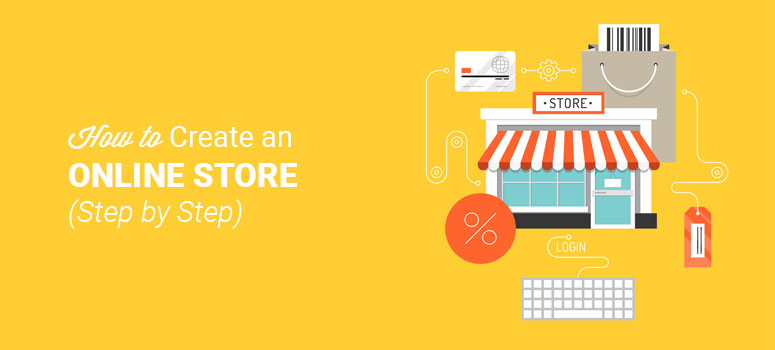
Apakah Anda ingin membuat toko online? Kami tidak terkejut. Cara memulai toko eCommerce adalah salah satu tutorial yang paling banyak diminta dari pemirsa kami.
Industri eCommerce sedang booming dan tren ritel saat ini menunjukkan bahwa 51% orang Amerika lebih suka belanja online. Ini adalah waktu terbaik untuk memasuki bisnis eCommerce. Jika Anda bertanya-tanya bagaimana cara memulai toko online, maka panduan ini adalah untuk Anda.
Di bawah ini, kami telah membuat langkah demi langkah untuk memulai toko online yang dapat Anda gunakan untuk membuat toko Anda sendiri. Anda tidak harus menjadi orang yang paham teknologi. Anda dapat membangun toko online tanpa menulis satu baris kode, kami berjanji.
Untuk membantu Anda dengan mudah mengikuti panduan ini, kami telah memecahnya menjadi 10 bagian yang berbeda:
Bab 1: Memutuskan Apa yang Dijual

Sebelum Anda mulai membangun toko online, Anda harus memutuskan apa yang akan Anda jual. Memilih produk yang tepat untuk dijual adalah penting bagi keberhasilan toko online Anda.
Secara keseluruhan, Anda perlu menjual produk yang ingin dibeli oleh pembeli online. Untuk membantu Anda menentukan apa yang akan dijual di toko online Anda, Anda akan ingin melihat sejumlah faktor, termasuk:
Permintaan pasar – Permintaan pasar menggambarkan permintaan untuk produk tertentu dan siapa yang ingin membelinya. Jadi, jika permintaan pasar untuk suatu produk tinggi, maka orang lebih cenderung membeli produk itu dari toko online Anda, dan membayar lebih untuk itu juga. Anda dapat meneliti permintaan pasar dengan menggunakan alat gratis seperti Alat Perencana Kata Kunci Google. Ketikkan kata kunci untuk suatu produk, misalnya, “pelembab wajah organik”. Jika ada volume pencarian tinggi untuk kata kunci tersebut, itu menunjukkan ada banyak pembeli online yang mencari produk itu. Kompetisi – Mungkin ada permintaan tinggi untuk suatu produk, tetapi jika ada terlalu banyak kompetisi, toko online Anda mungkin tidak menonjol dari kerumunan. Jadi, penting untuk meneliti pesaing Anda. Lakukan pencarian Google sederhana untuk kata kunci produk Anda dan lihat perusahaan yang muncul di bagian atas hasil pencarian. Tentukan bagaimana Anda akan berbeda dari mereka untuk meyakinkan pembeli untuk membeli dari toko online Anda. Apa yang Tren – Jika Anda dapat mulai menjual produk di toko online yang sedang tren, Anda akan dapat menangkap pembeli online sebelum kompetisi melakukannya. Jadi, tetap di atas apa yang sedang tren. Anda dapat melihat situs web seperti Amazon, eBay, dan Etsy, dan menelusuri daftar "Apa yang Terpanas" dan "Yang Paling Diinginkan" untuk menemukan produk-produk terbaru yang paling dicari.
Ingat, apa pun yang Anda pilih untuk dijual di toko online Anda, itu harus menjadi sesuatu yang Anda sukai. Memulai toko online dengan harapan menghasilkan uang, tetapi memilih untuk menjual sesuatu yang tidak Anda minati atau ketahui, tidak akan membawa Anda sukses. Semangat Anda untuk produk harus bersinar di situs web Anda. Jika Anda benar-benar menikmati dan percaya pada produk yang Anda jual, pembeli online akan lebih cenderung membeli dari Anda.
Untuk membantu Anda mengetahui apa yang harus dijual di toko online Anda, teruslah membaca.
1.1. Barang Digital vs. Fisik
Pertama, Anda perlu memutuskan apakah Anda akan menjual produk digital atau barang fisik. Produk fisik telah lama menjadi pilihan populer untuk jual dan beli online, tetapi produk digital menjadi semakin populer dan berharga.
Mari kita lihat perbedaan antara produk digital dan fisik.
Apa itu Produk Fisik?
Produk fisik adalah produk yang dapat disentuh dan nyata yang Anda jual dan kirimkan kepada pelanggan Anda. Pakaian, furnitur, makanan, produk kecantikan, lukisan, dll. Semuanya adalah produk fisik.
Beberapa contoh toko online populer yang menjual produk fisik termasuk Amazon, Walmart, Target, Pakaian Amerika, dan Best Buy.

Apa itu Produk Digital?
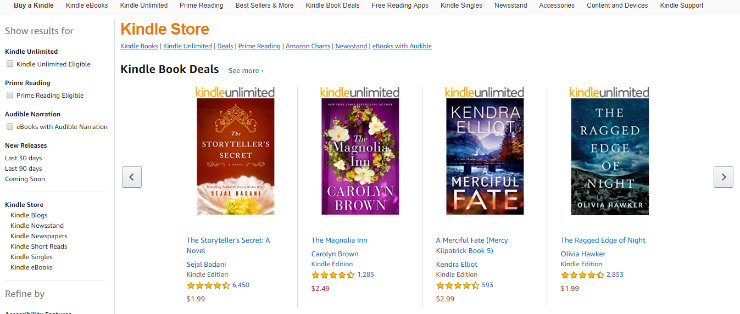
Produk digital, juga dikenal sebagai e-good, adalah produk atau bentuk media yang tidak berwujud yang dapat dijual dan didistribusikan berulang kali secara online tanpa perlu mengganti inventaris Anda. Produk digital datang dalam bentuk file yang dapat diunduh, PDF, plugin, video, file yang dapat streaming, template, dll. EBuku, perangkat lunak, buku audio, musik, dan seni digital adalah semua contoh produk digital.
Beberapa contoh toko online populer yang menjual produk digital termasuk Amazon Kindle Store, iTunes, Shutterstock, dan Themify yang menjual tema WordPress.
Pro dan Kontra: Produk Digital vs. Fisik
Ada pro dan kontra untuk menjual produk digital dan fisik, Anda harus mempertimbangkan pro dan kontra untuk memutuskan jenis produk apa yang harus Anda jual di toko online Anda.
Jadi, mari kita membahas pro dan kontra dari masing-masing.
Produk Fisik
Pro:
Nilai Yang Jelas – Mendemonstrasikan nilai produk fisik sangat mudah. Tujuan dari produk fisik biasanya jelas dan mudah dimengerti. Nilai Persepsi Yang Lebih Tinggi – Karena produk fisik berwujud, pembeli sering mengasosiasikannya dengan nilai persepsi yang lebih tinggi. Mudah digunakan – Dengan produk fisik, biasanya tidak ada banyak penjelasan, pelatihan, atau tindak lanjut yang terlibat. Hanya menjual, mengirim, dan pelanggan dapat menggunakannya segera.
Cons:
Biaya pengiriman – Karena Anda harus mengirimkan produk fisik, Anda harus mempertimbangkan biaya pengiriman dan penanganan. Lebih banyak waktu – Pengiriman produk fisik ke pelanggan di seluruh negeri membutuhkan waktu. Penyimpanan – Jika Anda menjual produk fisik, sebagian besar waktu Anda membutuhkan banyak ruang untuk menyimpan produk Anda.
Produk Digital
Pro:
Tidak Ada Persediaan – Dengan produk digital, Anda tidak memiliki inventaris apa pun. Itu berarti Anda tidak perlu berurusan dengan memesan sejumlah unit dan menyimpannya. Tanpa Biaya Pengiriman atau Waktu – Anda tidak perlu mengirimkan produk digital. Pelanggan mengunduh produk digital langsung ke perangkat mereka, yang berarti mereka mendapatkan produk secara instan dan Anda dapat mengirimnya secara gratis juga. Lebih mudah diukur – Karena Anda dapat menjual produk digital yang sama berulang kali dan tidak perlu berurusan dengan inventaris atau penyimpanan, jauh lebih mudah untuk meningkatkan skala dan mengembangkan bisnis Anda. Secara keseluruhan lebih simpel – Untuk semua alasan di atas, produk digital secara keseluruhan lebih mudah dijual dan lebih mudah dikelola.
Cons:
Sulit Menunjukkan Nilai – Dengan produk digital, lebih sulit untuk menunjukkan nilai. Dibutuhkan lebih banyak pekerjaan untuk meyakinkan pelanggan bahwa produk digital Anda layak dibeli. Nilai Persepsi Lebih Rendah – Karena produk digital bukanlah sesuatu yang dapat dipegang oleh pelanggan, mereka terkait dengan nilai persepsi yang lebih rendah. Banyak Persaingan – Karena produk digital sangat mudah dijual online, banyak orang melakukannya sekarang. Jadi, Anda cenderung memiliki banyak kompetisi. Tetapi ada persaingan dengan penjualan produk fisik juga.
Seperti yang Anda lihat, ada pro dan kontra untuk menjual produk digital dan fisik. Menjual produk digital sedang meningkat karena mudah untuk mulai menjual produk digital secara online. Anda tidak perlu menghabiskan banyak uang untuk memulai dan Anda dapat menjual produk yang sama berulang-ulang. Tetapi konsumen juga mencari produk fisik. Jadi, pertimbangkan pro dan kontra, dan putuskan pilihan mana yang terbaik untuk Anda.
1.2. Menciptakan Produk Anda Sendiri vs Menjual Produk yang Didirikan
Selanjutnya, Anda perlu memutuskan apakah Anda ingin membuat produk sendiri atau menjual produk yang sudah mapan.
Jika Anda ingin membuat produk Anda sendiri maka Anda harus mengerti itu akan memakan banyak waktu Anda. Misalnya, jika Anda menjual syal rajutan tangan, Anda harus menghabiskan waktu membuat banyak inventaris sebelumnya atau menghabiskan berminggu-minggu membuat item baru setiap kali seseorang memesan satu, yang akan mengakibatkan pelanggan harus menunggu lebih lama untuk menerima barang mereka.
Selain produk buatan tangan, membuat produk fisik Anda sendiri seperti penyedot debu terbaik berikutnya akan memakan banyak waktu, kadang-kadang bertahun-tahun, dan Anda harus menghabiskan banyak uang, yang mungkin bukan rute terbaik untuk Anda.
Di sisi lain, membuat produk digital Anda sendiri jauh lebih mudah. Misalnya, jika Anda memutuskan untuk menjual templat, Anda dapat membuat templat dalam beberapa jam dan menjualnya berulang-ulang – lebih mudah.
Menjual produk yang sudah mapan adalah cara termudah untuk pergi karena Anda tidak perlu menghabiskan waktu membangun atau membuat produk. Plus, dengan produk-produk tertentu yang ada, banyak pemasaran dilakukan untuk Anda juga. Pembeli sudah terbiasa dengan produk dan nilainya, oleh karena itu, membuat keputusan untuk membeli akan lebih mudah bagi mereka.
1.3. Toko Afiliasi Amazon
Jenis toko online lain yang dapat Anda buat adalah toko afiliasi Amazon. Dengan toko afiliasi Amazon, Anda dapat menjual produk di situs web yang dibawanya oleh Amazon. Jadi, Anda tidak perlu khawatir tentang membuat produk Anda sendiri atau berurusan dengan menyimpan inventaris, pengiriman dan penanganan, melacak stok, dan sebagainya.
Toko afiliasi Amazon dikelola melalui Internet Mitra Amazon program, yang memungkinkan Anda untuk mendapatkan persentase pada setiap produk Amazon yang dipromosikan dan dijual melalui situs web Anda.
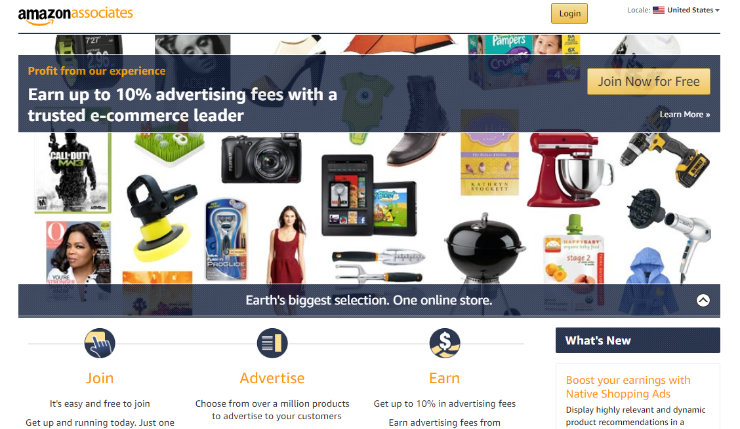
Menjadi afiliasi Amazon gratis, yang harus Anda lakukan adalah mendaftar. Plus, Anda memiliki pilihan untuk membuat toko online baru untuk mendaftar dan menjual produk Amazon atau Anda dapat menggunakan situs web yang ada untuk menjual produk mereka dan menghasilkan uang.
Untuk tutorial langkah demi langkah tentang cara memulai toko afiliasi Amazon, lihat artikel kami di cara membuat toko afiliasi Amazon dengan WordPress.
1.4. Penjualan Reguler vs. Model Berlangganan
Saat membuat toko online, Anda juga harus memutuskan apakah akan menggunakan model penjualan reguler atau menggunakan model berlangganan.
Penjualan reguler, juga dikenal sebagai penjualan 1 kali, adalah ketika pelanggan membeli produk dan dikirimkan 1 kali kepada mereka. Jika mereka ingin memesan produk lain, mereka harus mengunjungi situs web Anda, membelinya lagi, dan kemudian barang tersebut akan dikirimkan kepada mereka untuk kedua kalinya.
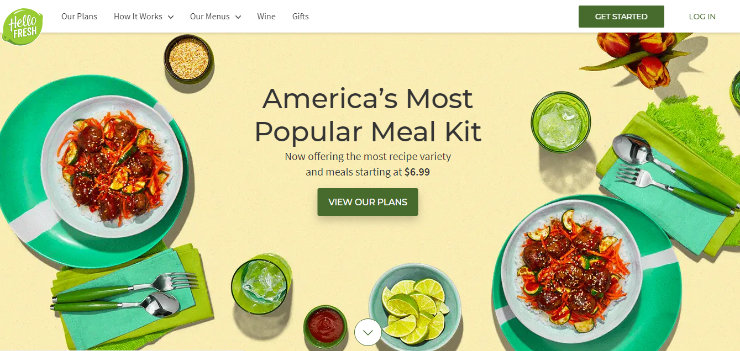
Tetapi model berlangganan adalah ketika pelanggan membayar harga berulang secara berkala untuk akses ke suatu produk atau layanan.
Misalnya, Halo segar menggunakan model berlangganan. Pelanggan membayar biaya berulang dan kit makan setiap minggu dikirimkan kepada mereka.
Beberapa toko online populer lainnya yang mengikuti model berlangganan termasuk BarkBox, FabFitFun, dan Netflix.
Anda dapat menjual produk digital melalui model berlangganan juga. Banyak perusahaan perangkat lunak dan plugin membebankan biaya bulanan kepada pelanggan untuk menggunakan produk.
Ketika Anda menjual produk ke pelanggan 1 kali, maka Anda harus bekerja keras untuk mendapatkannya kembali. Tetapi dengan model berlangganan, Anda memiliki pendapatan berulang bulanan yang dapat Anda andalkan.
Bab 2: Menentukan Harapan yang Tepat

Sebelum memulai toko online Anda, Anda juga perlu menetapkan harapan yang tepat. Jika Anda baru mengenal eCommerce, Anda mungkin tidak menyadari kesalahan umum yang dibuat situs web eCommerce baru. Menghindari kesalahan pemula ini akan membantu menempatkan toko online Anda di jalan menuju sukses. Jadi, mari kita lihat beberapa kesalahan eCommerce yang paling umum.
Ekspektasi Penjualan yang Tidak Realistis
Jelas, kebanyakan orang ingin membuat toko online untuk menghasilkan uang. Beberapa berharap bahwa yang perlu mereka lakukan adalah membangun situs web mereka, menambahkan produk mereka secara online, dan uang besar akan mulai bergulir. Tetapi menjadi sebuah toko online yang sukses dengan banyak pemasukan membutuhkan waktu dan kerja. Jadi, Anda harus menetapkan tujuan realistis untuk toko online Anda. Menetapkan sasaran pendapatan dan melacaknya akan membantu Anda melihat seberapa baik kinerja toko online Anda dan seberapa dekat Anda dengan menjadikan toko online Anda sebagai bisnis yang lengkap.
Tetapkan tujuan realistis untuk:
Penjualan Harian Penjualan Bulanan Penjualan Tahunan
Dengan sasaran-sasaran ini, Anda juga harus mempertimbangkan biaya menjalankan toko online Anda. Toko Anda hanya akan menguntungkan jika penjualan Anda melebihi biaya Anda. Seiring pertumbuhan toko online Anda, Anda dapat menyesuaikan tujuan dan harapan Anda agar sesuai.
Tidak Ada Target Pemirsa
Tidak semua orang akan menjadi pelanggan Anda. Jika Anda mencoba menjadi segalanya bagi semua orang, toko online Anda tidak akan berhasil. Anda perlu memutuskan siapa audiens target Anda dan Anda perlu merancang dan memasarkan toko online Anda dengan orang-orang dalam pikiran. Selain itu, Anda perlu memberi alasan kepada audiens untuk berbelanja dengan Anda alih-alih situs web besar seperti Amazon atau Walmart.
Buat profil pelanggan untuk pelanggan ideal Anda yang mencakup:
Demografi – Demografi dasar audiens target Anda seperti usia, jenis kelamin, lokasi, pekerjaan, gaya hidup, dll. Minat – Apa yang diminati audiens Anda? Memasak, berkemah, mode, olahraga, dll. Nilai dan Keyakinan – Putuskan apa yang penting bagi audiens Anda? Menjadi etis? Jujur? Poin Nyeri – Masalah / masalah apa yang dihadapi audiens target Anda? Dan bagaimana toko online Anda membantu menyelesaikan masalah itu?
Menentukan target audiens Anda akan membantu bisnis Anda terhubung dengan pembeli dan menghasilkan lebih banyak penjualan.
Desain Situs Buruk
Banyak pemilik toko online baru gagal menyadari pentingnya desain situs yang bagus. Situs web Anda sering kali menjadi hal pertama yang akan dilihat pelanggan Anda. Jika desain toko online Anda berantakan, tidak profesional, dan sulit dinavigasi, pembeli tidak akan mau membeli dari Anda.
Jadi, pastikan toko online Anda memiliki tema modern, mudah dinavigasi, dan terlihat hebat di ponsel juga. Logo profesional yang dapat Anda tampilkan di situs eCommerce Anda juga membantu mempromosikan kepercayaan antara pembeli dan situs web Anda.
Layanan Pelanggan Buruk
Layanan pelanggan yang baik adalah salah satu bagian terpenting dari memiliki toko online yang sukses. Pelanggan akan ingin tahu bahwa Anda memberikan layanan pelanggan yang baik bahkan sebelum mereka melakukan pembelian. Anda dapat membuktikan hal ini kepada mereka dengan menambahkan kebijakan pengembalian ke situs web Anda, memberikan informasi kontak dukungan seperti email atau nomor telepon, atau bahkan menambahkan obrolan langsung ke situs web Anda.
Jika Anda tidak menyediakan layanan pelanggan yang cepat dan efisien, Anda berisiko kehilangan pelanggan Anda.
Kami akan membahas langkah-langkah yang dapat Anda ambil untuk menghindari kesalahan ini di artikel selanjutnya. Tetapi pertama-tama, Anda harus memilih platform eCommerce yang tepat dan mulai membangun situs web Anda.
Bab 3: Memilih Platform eCommerce untuk Membuat Toko Online
Memilih platform eCommerce yang tepat sangat penting untuk bisnis Anda karena sulit untuk mundur jika keputusan Anda ternyata salah. Faktanya, 60% pemilik toko menengah ke besar setuju bahwa mereka seharusnya melakukan uji tuntas yang lebih baik sebelum memilih platform eCommerce mereka.
3 platform eCommerce paling populer yang kami rekomendasikan adalah Shopify, BigCommerce, dan WordPress + WooCommerce.
Mari kita cepat melihat masing-masing platform eCommerce populer ini.
3.1. Showdown Platform eCommerce Terbaik
Shopify
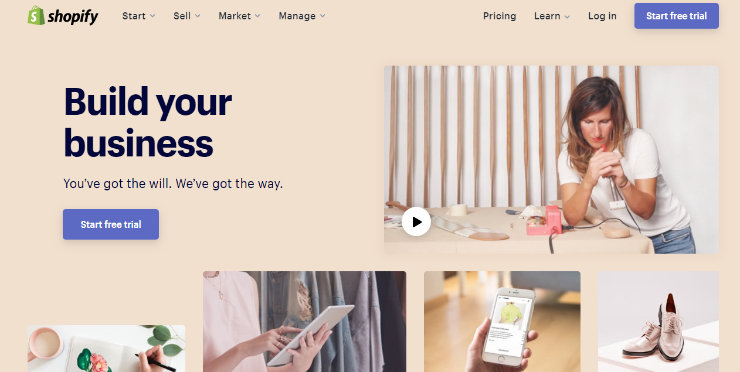
Shopify adalah solusi eCommerce yang di-host sepenuhnya yang dimulai dari $ 29 / bulan. Shopify membuatnya sangat mudah untuk meluncurkan toko tanpa harus menginstal perangkat lunak apa pun atau mengelola server hosting web.
Meskipun memungkinkan Anda untuk menyesuaikan desain toko Anda, opsi penyesuaian terbatas jika dibandingkan dengan platform eCommerce yang di-hosting-sendiri. Anda juga harus membayar biaya transaksi untuk setiap pesanan selain biaya bulanan. Itu berarti biaya riil Anda akan lebih tinggi dari $ 29 per bulan, dan itu akan meningkat seiring pertumbuhan toko Anda.
Pro:
Mudah digunakan dan mudah dipelajari. Shopify mengelola toko online Anda untuk Anda. Melakukan penskalaan situs web Anda mudah dan terjangkau.
Cons:
Anda tidak memiliki kendali penuh atas situs Anda. Anda harus membayar biaya transaksi. Kustomisasi terbatas karena tidak dapat memilih fitur yang Anda inginkan.
Baca lengkap kami Ulasan Shopify.
BigCommerce
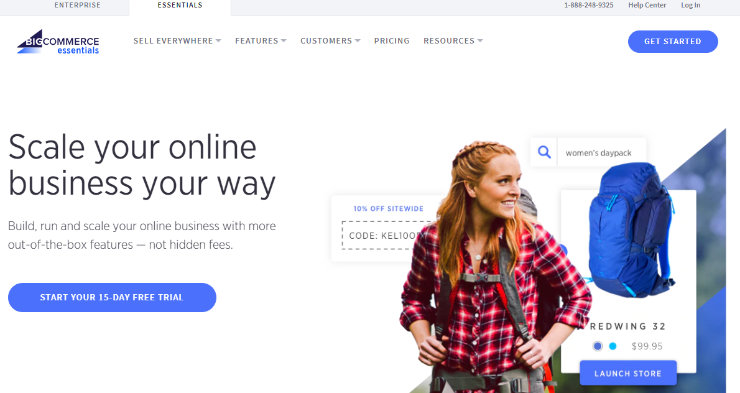
BigCommerce adalah solusi eCommerce lain yang sepenuhnya dihosting. Itu berarti Anda dapat dengan cepat membuat toko online tanpa harus mengelola aspek teknis apa pun. Cukup buat akun dengan BigCommerce, rancang toko online Anda dalam sekejap menggunakan 1 dari banyak template eCommerce ramping mereka, tambahkan produk Anda, dan mulai menjual.
Anda dapat memulai dengan BigCommerce hanya dengan $ 29,95 per bulan yang mencakup produk tanpa batas, penyimpanan file, dan bandwidth. Selain itu, dengan BigCommerce tidak ada biaya transaksi untuk menggunakan gateway pembayaran terkemuka tidak seperti dengan Shopify.
Pro:
User-friendly dan mudah untuk memulai situs. Tidak ada biaya transaksi. Ini adalah solusi yang di-host sepenuhnya, Anda tidak perlu khawatir tentang mengelola situs Anda.
Cons:
Anda tidak memiliki kendali penuh atas situs Anda. Kustomisasi untuk situs Anda terbatas, hanya beberapa tema gratis untuk dipilih. Batas penjualan online tahunan, jika Anda melebihi batas Anda harus meningkatkan paket Anda.
WooCommerce

Dengan solusi eCommerce yang di-hosting sendiri seperti WooCommerce, Anda akan mendapatkan kontrol penuh atas toko online Anda. WooCommerce adalah platform pilihan bagi hampir 28% dari semua toko online. Yang terbaik, itu bekerja di atas WordPress sebagai plugin gratis, jadi jika Anda terbiasa dengan WordPress, maka Anda dapat dengan mudah mengelola toko dengan WooCommerce. Selain itu, jika Anda sudah memiliki situs web atau blog WordPress, Anda dapat dengan mudah mengubahnya menjadi toko online menggunakan WooCommerce.
WooCommerce hadir dengan sejumlah fitur bawaan seperti pengiriman, pemrosesan pembayaran, manajemen inventaris, kupon, pelaporan, dan banyak lagi. Anda juga memiliki kemampuan untuk membeli ekstensi WooCommerce untuk menambah daya ke toko online Anda atau menggunakan sejumlah pihak ketiga gratis dan berbayar Plugin WooCommerce untuk membantu menumbuhkan penjualan Anda.
Plus, karena WooCommerce adalah platform sumber terbuka dan plugin WordPress eCommerce, itu gratis untuk diunduh dari repositori WordPress.org. Untuk memulai dengan WooCommerce, yang Anda butuhkan hanyalah nama domain, sertifikat SSL, dan akun hosting web. Dengan beberapa perusahaan web hosting terbaik, Anda bisa mendapatkan semua ini hanya dengan $ 3-5 / bulan, menjadikan WooCommerce cara paling murah untuk memulai toko online.
Pro:
Kontrol penuh atas situs Anda. WooCommerce adalah perangkat lunak open source, kustomisasi tidak ada habisnya dengan addons. Lebih terjangkau daripada platform eCommerce lainnya. Opsi hosting web terkelola yang lebih terjangkau yang khusus untuk WooCommerce. Tidak ada biaya transaksi.
Cons:
Anda harus mengelola situs Anda sendiri termasuk keamanan, pembaruan, cadangan, dan sebagainya. Fitur tanpa batas dapat membuatnya agak sulit untuk dipelajari. Melakukan penskalaan toko online Anda lebih sulit, karena Anda harus mengelola situs Anda sendiri atau membayar lebih untuk hosting web yang dikelola.
Penting untuk dicatat bahwa untuk menggunakan plugin WooCommerce WordPress, Anda harus membangun situs Anda dengan WordPress.org, bukan WordPress.com. Lihat artikel kami di WordPress.com vs. WordPress.org untuk mempelajari lebih lanjut tentang perbedaan antara 2.
3.2. Mengapa Kami Rekomendasikan WooCommerce untuk Membuat Toko Online
Sementara platform eCommerce seperti Shopify dan BigCommerce sedikit lebih mudah digunakan dan dilengkapi dengan semua yang Anda butuhkan di luar kotak untuk dengan mudah membuat toko online, WooCommerce hadir dengan biaya awal yang lebih rendah dan Anda memiliki kontrol lebih besar terhadap situs Anda.
Dengan WooCommerce, Anda memiliki kendali penuh atas bagaimana penampilan dan kinerja toko online Anda. Sama seperti kami menyarankan untuk membuat situs web dengan WordPress karena opsi kustomisasi yang tak ada habisnya, hal yang sama berlaku untuk membuat toko online dengan WooCommerce. Toko online dengan WooCommerce memungkinkan Anda menggunakan banyak plugin WordPress untuk menambahkan lebih banyak fitur ke toko online Anda.
Plus, Anda mendapatkan akses ke banyak hal luar biasa Tema WooCommerce untuk memberikan toko Anda persis tampilan yang Anda inginkan. Itu juga dilengkapi dengan integrasi, metode pembayaran, add-on, dan banyak lagi.
Karena komunitas WooCommerce dan WordPress sangat besar, jika Anda pernah mengalami masalah dengan toko online Anda, ada banyak komunitas dan forum online yang tersedia untuk membantu Anda.
Membuat toko online dengan WooCommerce memungkinkan Anda membuat persis jenis situs web eCommerce yang Anda inginkan, tanpa harus menghabiskan sebagian besar anggaran Anda.
Terkait: 6 Platform eCommerce Terbaik untuk Pasar Multivendor
3.3. Prasyarat untuk Membuat Toko Online
Seperti yang kami sebutkan sebelumnya, ketika Anda membuat toko online dengan WooCommerce, ada beberapa hal yang Anda butuhkan sebelum memulai. Karena WooCommerce adalah plugin WordPress, Anda memerlukan situs WordPress yang di-host-sendiri bersama dengan 3 hal ini: nama domain, sertifikat SSL, dan hosting web. Mari kita bahas masing-masing prasyarat ini dan mengapa Anda membutuhkannya.
Nama domain
Nama domain adalah alamat situs web Anda. Pengguna dapat mengetik nama domain Anda di bilah alamat browser mereka dan mendapatkan akses ke situs web Anda. Misalnya, beberapa nama domain populer yang mungkin Anda kenal termasuk www.IsItWP.com, www.Amazon.com, www.Facebook.com, dan www.WPBeginner.com.

Tanpa nama domain, pengguna tidak akan dapat mengunjungi situs web eCommerce Anda dari komputer mereka sendiri. Jadi, jika Anda ingin membuat toko online, Anda harus membeli nama domain yang cocok dengan nama merek toko online Anda.
Untuk penjelasan lebih rinci, lihat artikel kami: Apa itu Nama Domain dan Bagaimana Cara Kerjanya?
Sertifikat SSL
Sertifikat SSL (Lapisan Soket Aman), juga dikenal sebagai sertifikat digital, membuat tautan aman antara situs web dan browser pengunjung. Ini memastikan bahwa semua data yang dikirimkan antara pembeli Anda dan situs web Anda aman dan terjamin. Sertifikat SSL diperlukan di situs web apa pun yang akan menerima informasi kartu kredit.
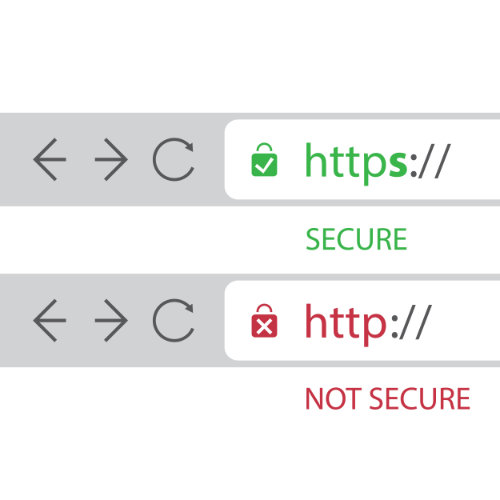
Selain itu, menampilkan sertifikat SSL di situs Anda membangun kepercayaan antara situs web Anda dan pelanggan Anda. Jika toko online Anda tidak aman, pengguna tidak akan mau membeli dari Anda. Tetapi sertifikat SSL menunjukkan kepada mereka bahwa informasinya ada di tangan yang aman.
Hosting Web
Saat membuat situs web eCommerce dengan WordPress dan WooCommerce yang di-hosting sendiri, Anda juga perlu membeli hosting web. Kapan kamu membuat situs web, semua file disimpan di komputer Anda dan tidak ada orang lain yang bisa melihatnya. Tetapi ketika Anda membeli hosting web, perusahaan hosting web menyimpan file situs web Anda di ruang di web sehingga pengguna lain dapat mengunjungi situs web Anda.
Web hosting pada dasarnya adalah tempat situs Anda tinggal di internet. Sama seperti toko ritel yang membutuhkan lokasi fisik yang dapat dikunjungi oleh pembeli, toko online Anda juga membutuhkan ruang di web yang dapat dikunjungi pengguna. Web hosting akan menyediakannya untuk Anda.
Jika Anda takut bahwa semua prasyarat ini akan mahal, jangan khawatir. Kami akan menunjukkan kepada Anda bagaimana Anda bisa mendapatkan nama domain gratis, sertifikat SSL gratis, dan hosting web yang terjangkau di bagian pasangan berikutnya.
3.4. Cara Memilih Nama Merek
Memilih nama merek itu penting. Nama merek pada dasarnya adalah nama toko online Anda. Nama merek Anda biasanya juga harus sesuai dengan nama domain Anda. Misalnya, pikirkan toko online paling populer di web, Amazon. Nama merek mereka adalah Amazon dan nama domain mereka adalah www.Amazon.com. Memiliki nama merek dan nama domain Anda yang sama memudahkan pembeli untuk mengingat dan menemukan situs web Anda di internet.
Tetapi Anda tidak bisa hanya memilih nama merek secara acak. Sebaliknya, Anda perlu memilih nama merek yang membuat Anda menonjol dari pesaing. Jadi, bagaimana Anda memilih nama merek terbaik untuk toko online Anda? Berikut adalah beberapa tips untuk memilih nama merek terbaik:
Tetap Pendek dan Sederhana – Nama merek Anda harus singkat dan sederhana sehingga mudah bagi pelanggan Anda untuk mengingat dan mengeja. Nama merek yang lebih lama dan rumit dapat salah eja saat pelanggan mengetikkan nama domain Anda di bilah alamat, sehingga mereka tidak dapat menemukan toko online Anda. Jadilah unik – Dengan begitu banyak toko online di web, nama merek Anda harus unik agar dapat menonjol dari orang banyak. Lihatlah pesaing Anda, jika mereka menggunakan kata "elektronik" dalam nama merek mereka, buatlah kata lain yang dapat Anda gunakan untuk membedakan diri Anda. Gunakan Kata Kunci – Menggunakan kata kunci dalam nama merek Anda akan membantu toko online Anda ditemukan oleh lebih banyak orang secara online. Misalnya, jika toko online Anda menjual sepatu, pertimbangkan untuk menambahkan kata "sepatu" ke nama merek Anda untuk meningkatkan hasil pencarian organik Anda.
Untuk meningkatkan inspirasi Anda, berikut adalah beberapa contoh nama merek yang luar biasa dan unik:
Jika Anda kesulitan membuat nama merek, Anda juga dapat menggunakan gratis dari kami Generator Nama Domain untuk membantu Anda menemukan sesuatu yang luar biasa.
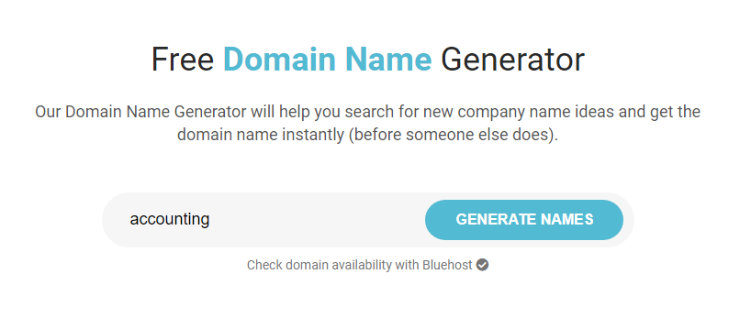
Cukup ketik 1 atau 2 kata kunci dan alat ini akan memberi Anda sejumlah ide nama merek. Alat ini juga memeriksa ketersediaan nama domain, jadi Anda tidak perlu khawatir memilih nama yang sudah diambil orang lain.
Setelah Anda menemukan nama merek yang sempurna, sekarang saatnya untuk memilih hosting web dan membeli nama domain.
3.5. Cara Memilih Web Hosting
Memilih web hosting terbaik adalah langkah penting lainnya dalam membuat toko online. Anda harus memilih solusi hosting web berkinerja tinggi untuk memberikan pengalaman berbelanja yang cepat dan nyaman bagi pelanggan Anda. Jika situs web eCommerce Anda lambat, bahkan hanya dalam penundaan 1 detik, itu bisa menurunkan penjualan Anda sebesar 7%. Seperti yang Anda lihat, penting untuk memilih hosting web yang memiliki kecepatan dan kinerja terbaik.
Ada beberapa faktor lain yang harus Anda pertimbangkan ketika memilih web hosting eCommerce terbaik termasuk:
Instalasi 1-Klik – Web hosting yang Anda pilih harus menawarkan instalasi 1-klik, mudah dari aplikasi eCommerce pilihan Anda seperti WooCommerce. Sertifikat SSL – Seperti yang kami sebutkan sebelumnya, Anda memerlukan sertifikat SSL untuk melindungi toko online Anda. Ini harus disediakan oleh perusahaan hosting web yang Anda pilih. Kepatuhan PCI – Anda juga harus memilih Hosting web yang sesuai PCI untuk menerima pembayaran kartu kredit dengan aman. Dukungan dan Cadangan – Pilih web hosting yang memberikan dukungan, pembaruan, dan cadangan yang luar biasa kapan pun Anda membutuhkannya.
Ada sejumlah hosting eCommerce terbaik perusahaan untuk dipilih. Beberapa rekomendasi utama kami adalah SiteGround Cloud, BigCommerce, Shopify, dan Mesin WP.
Namun, karena kami menyarankan Anda membangun toko online Anda dengan WordPress dan WooCommerce, kami sarankan untuk memilih Bluehost WooCommerce.
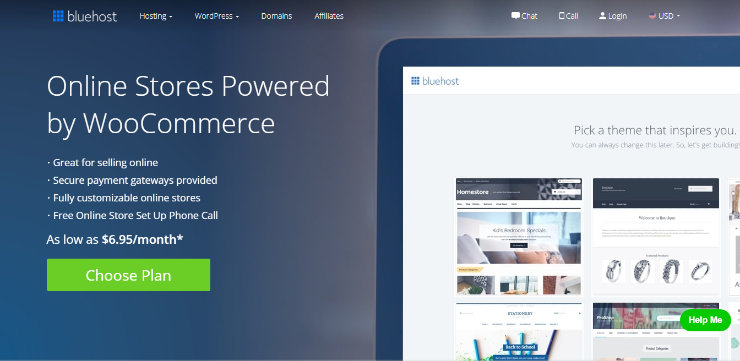
Bluehost WooCommerce menawarkan instalasi otomatis WooCommerce 1-klik, 1 nama domain gratis, sertifikat SSL gratis, alamat IP khusus, dan banyak lagi. Bluehost juga memberdayakan lebih dari 2 juta situs web di seluruh dunia dan secara resmi web hosting # 1 yang direkomendasikan oleh WordPress.org
Plus, mereka telah sepakat untuk menawarkan kepada pengguna kami a domain gratis, SSL gratis, dan diskon 50% untuk paket hosting mereka.
Mulai dengan Bluehost hari ini.
catatan: Kami percaya pada transparansi penuh. Jika Anda membeli hosting menggunakan tautan rujukan kami, maka kami akan mendapatkan komisi kecil tanpa biaya tambahan untuk Anda. Anda sebenarnya akan mendapatkan diskon untuk hosting + domain gratis + SSL gratis. Kami dapat memperoleh komisi dari hampir semua perusahaan hosting, tetapi kami hanya merekomendasikan produk yang kami yakini akan memberikan nilai bagi pembaca kami.
Bab 4: Membuat Toko Online – Panduan Teknis (Langkah demi Langkah)

Hanya karena bagian ini disebut "panduan teknis" tidak berarti Anda harus mengerti teknologi. Jika Anda dapat mengarahkan dan mengklik, maka Anda dapat mengikuti tutorial ini dan membuat toko online Anda siap dan berjalan dalam waktu singkat.
Mari kita lihat cara menyiapkan toko online di WordPress menggunakan WooCommerce.
4.1. Beli Nama Domain dan Akun Hosting WooCommerce
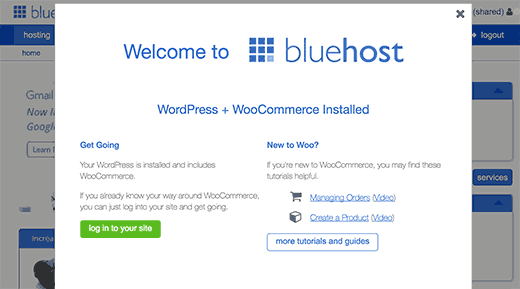
Untuk memulai toko WooCommerce Anda, pergilah ke Situs web Bluehost dan klik Mulai sekarang tombol.
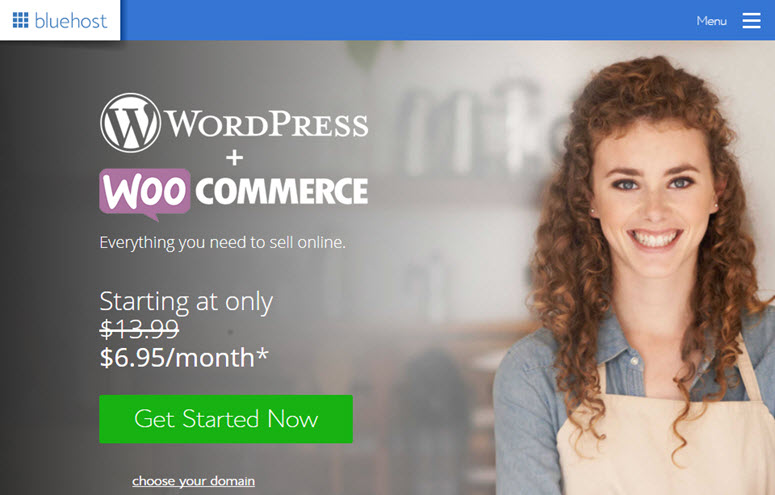
Di halaman berikutnya, Anda akan diminta untuk memilih paket. Setiap paket sudah diinstal sebelumnya dengan WooCommerce di atas WordPress bersama dengan a sertifikat SSL gratis.
Sertifikat SSL menambahkan lapisan keamanan khusus di situs web Anda, sehingga Anda dapat menerima informasi sensitif seperti nomor kartu kredit dan informasi pribadi lainnya. Ini diperlukan bagi Anda untuk menjalankan toko online dan menerima pembayaran kartu kredit.
Karena Anda baru memulai, Anda dapat memilih paket awal.
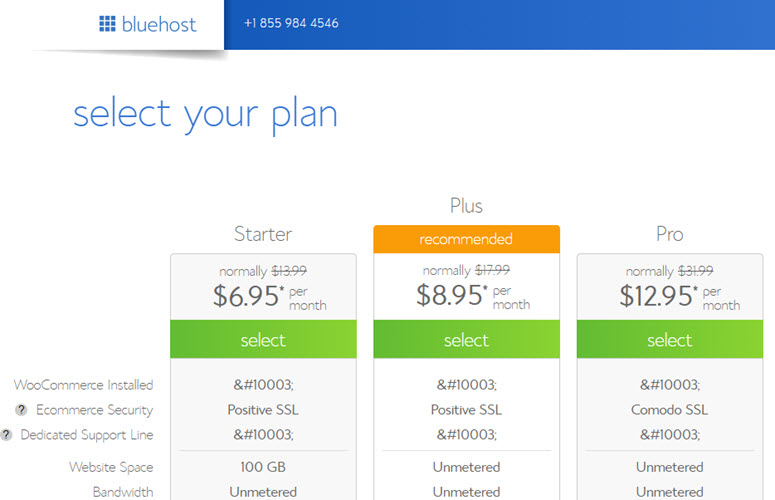
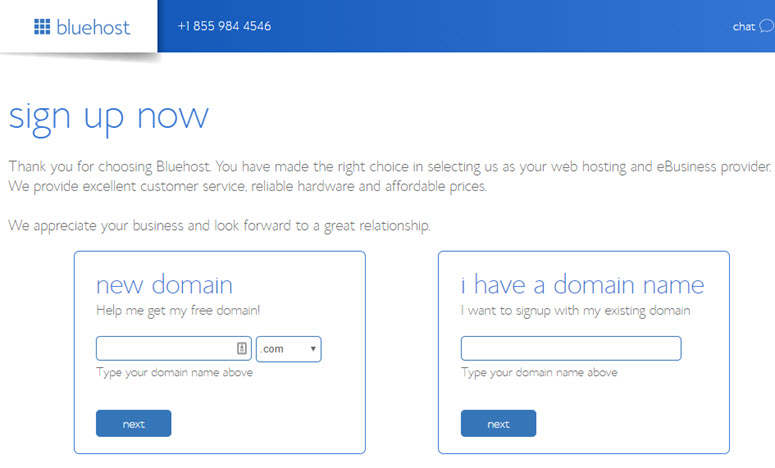
Anda dapat memilih untuk menggunakan domain yang ada yang Anda miliki atau mendapatkan domain baru gratis. Kami menyarankan mendaftarkan domain baru karena gratis.
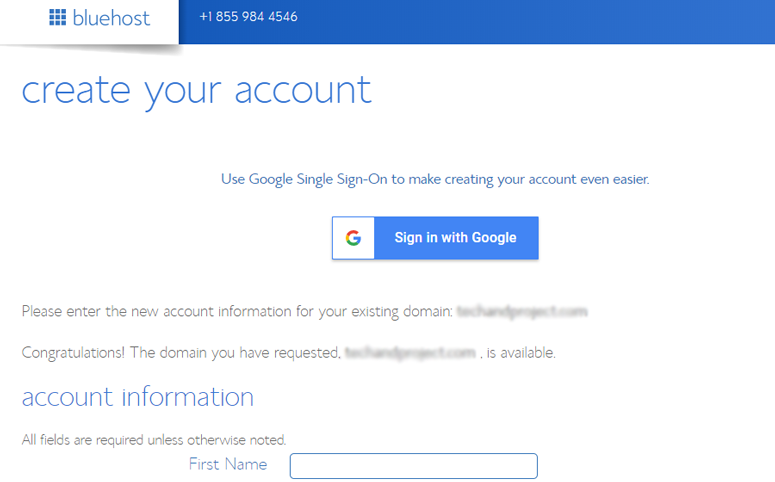
Anda sekarang akan diminta untuk memasukkan informasi akun Anda. Untuk pendaftaran yang mudah, Anda dapat masuk dengan info Google Anda hanya dengan beberapa klik.
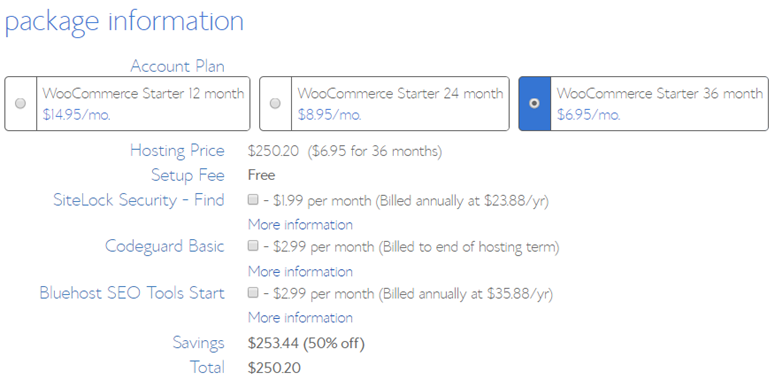
Setelah memasukkan detail Anda, gulir ke bawah halaman sampai Anda menemukan kotak informasi paket. Anda dapat memilih paket starter untuk 12 bulan, 24 bulan, atau 36 bulan. Anda juga akan melihat bahwa beberapa addon dipilih sebelumnya yang meningkatkan total harga Anda. Kami menyarankan Anda menghapus centang pada kotak-kotak ini karena Anda selalu dapat menambahkannya nanti jika Anda memutuskan bahwa Anda membutuhkan layanan ini.
Selanjutnya, Anda perlu menggulir ke bawah halaman lebih lanjut untuk memasukkan detail pembayaran Anda. Anda juga akan diminta untuk Menyetujui Ketentuan Layanan mereka, lalu klik Kirim.
Itu dia!
Anda telah berhasil berlangganan paket hosting WooCommerce. Anda sekarang akan menerima email dengan perincian tentang cara masuk ke panel kontrol hosting web (cPanel) tempat Anda dapat mengelola semuanya, mulai dari file hosting hingga email dan dukungan.
Silakan dan masuk ke cPanel Anda. Anda akan disambut dengan sembulan yang memberi tahu Anda bahwa WordPress, bersama dengan WooCommerce, telah diinstal sebelumnya. Anda sekarang dapat mengklik masuk ke situs Anda dan mulai mengelola toko online Anda.
Sekarang mari kita lihat bagaimana meluncurkan toko online Anda dengan WooCommerce.
4.2. Konfigurasikan WooCommerce
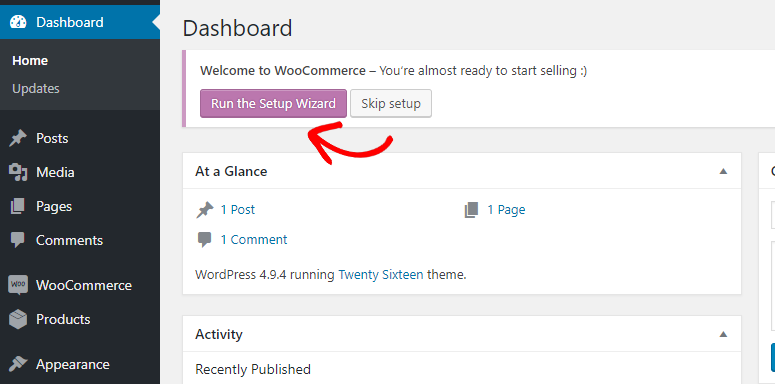
Dengan menggunakan kredensial masuk dari email Anda, Anda harus masuk ke dasbor WordPress di mana Anda akan melihat pesan sambutan. Silakan dan klik Saya tidak perlu tautan bantuan. Jangan khawatir, kami akan memandu Anda melalui setiap langkah proses.
Langkah pertama adalah memastikan bahwa Anda menentukan nama dan tagline situs Anda. Untuk melakukan ini, Anda perlu mengunjungi Pengaturan »Umum halaman dan masukkan judul dan deskripsi situs WordPress Anda.
Paket hosting WordPress Anda dilengkapi dengan Sertifikat SSL gratis. Sertifikat ini sudah diinstal sebelumnya untuk nama domain Anda. However, your WordPress site needs to be configured, so it loads as https vs http. You’ll also need to change your WordPress Address and Site Address to use https instead of http.

Next, you need to run the WooCommerce setup wizard. Simply click the Run the Setup Wizard button. The setup wizard will walk you through the basic configuration of WooCommerce storefront.
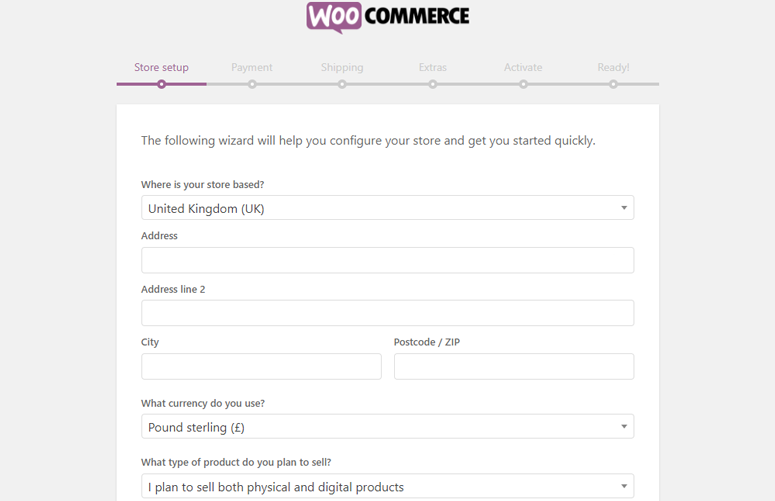
In the first step, you’ll be asked to specify your store’s location. You’ll also be prompted to select the currency you’d like to use. After completing the first step, you can proceed to the Payment step.
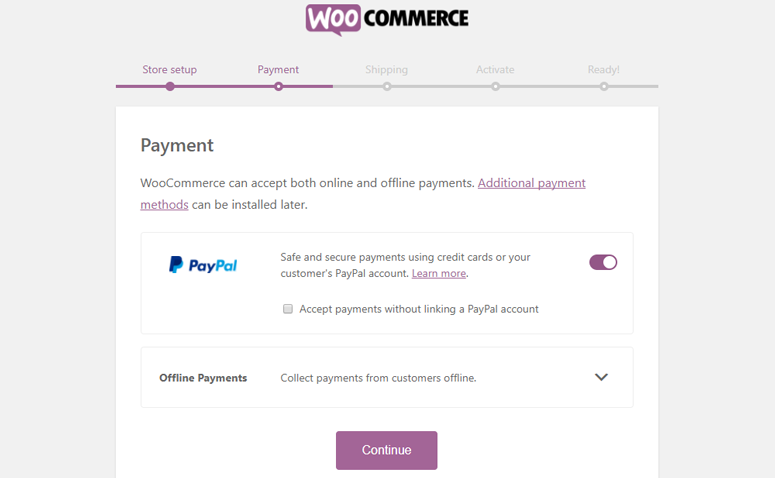
By default, WooCommerce only allows you to accept payments via PayPal. You can simply enter your PayPal email in this step without linking your PayPal account. If you want to add additional payment methods, then you’ll need to install respective addons (which you can do later).
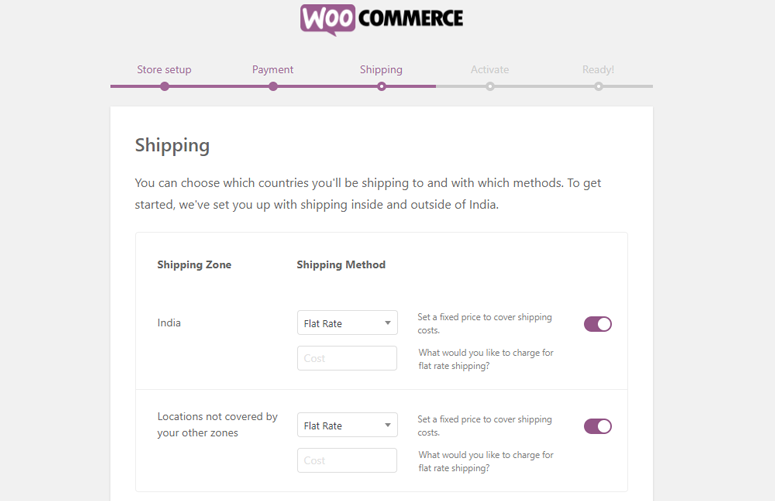
If you choose to sell physical goods on your WooCommerce store, then you’ll be asked to setup shipping methods and shipping fees for both national and international shipping.
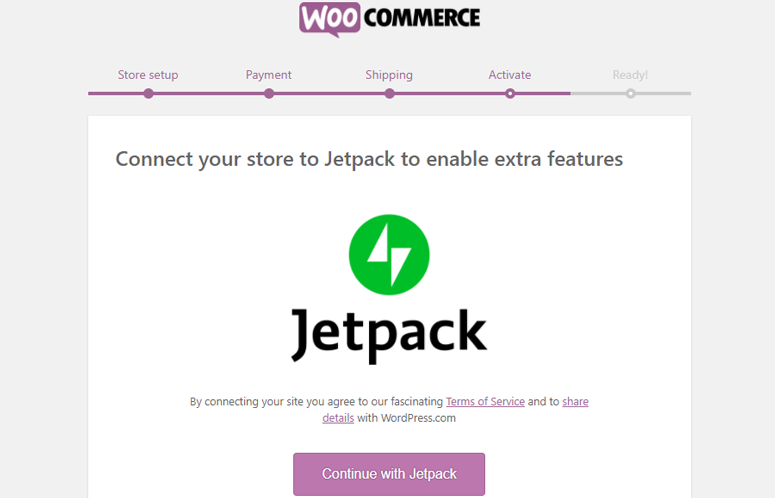
After setting up the shipping options, WooCommerce will persuade you to connect your site with Jetpack. Setting up Jetpack is not a necessary step for building a WooCommerce store, so you can skip it. You can find the Skip this step option at the bottom of the page.
You’re done with the setup wizard.

4.3. Change Your WordPress Theme
WordPress themes control the visual appearance of your website. To give a unique design to your website, all you have to do is find and install the right theme on it. With WordPress, you can customize an existing theme or even install a custom-built theme per your unique requirements.
By default, your WooCommerce store comes preinstalled with the Storefront theme. Storefront is a free WordPress theme offering deep integration with WooCommerce.
If you want to customize your Storefront theme without touching a single line of code, then you can get the Storefront Extensions Bundle that helps you delight your customers with a unique look.
Alternatively, you can easily find another WooCommerce-compatible theme in the free plugin repository. Before you choose a random theme from the official directory, it’s in your best interest to take a look at some WooCommerce compatible theme reviews, and decide which one would be a perfect choice for your needs.
A premium theme has to be downloaded from the theme vendor’s site and manually uploaded to your WordPress.
If you decide to go with a free WordPress theme from the official theme repository, then you can search and install it directly from your WordPress dashboard without having to download it to your computer.
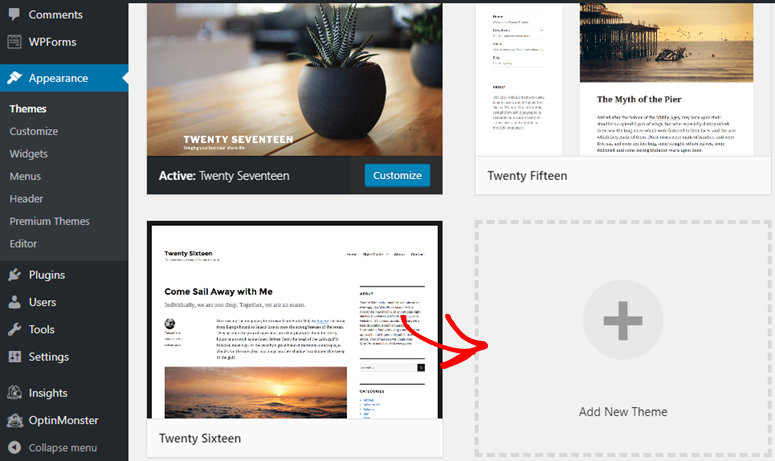
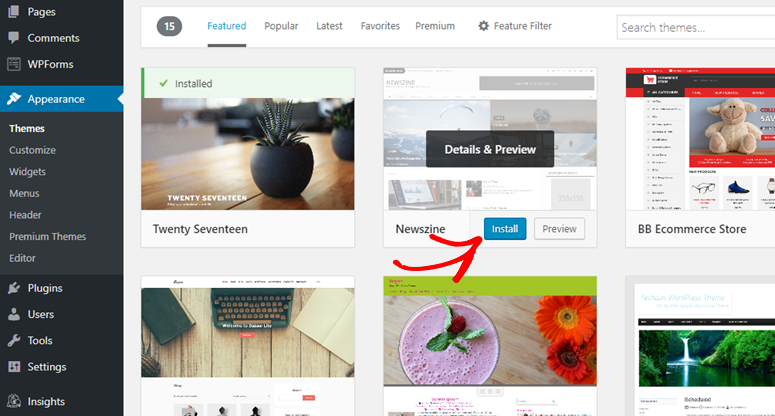
To install a free theme, navigate to Appearance » Themes in your WordPress dashboard. Then click the Add New Theme box. You can now find some featured themes in your dashboard.
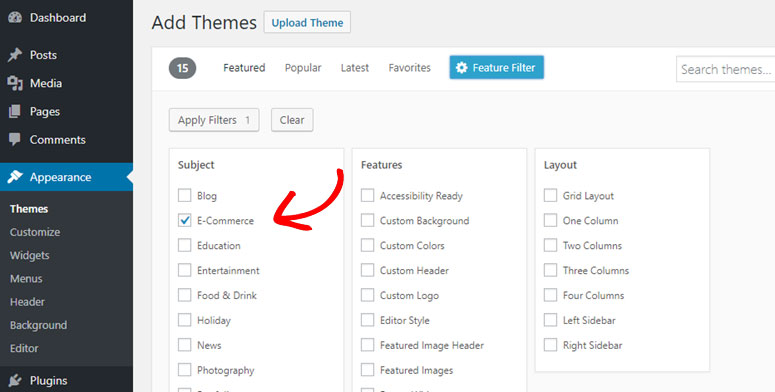
Before installing, you can preview your theme by clicking on the thumbnails displayed. You can also filter themes based on layouts, features, and niches by clicking on the Feature Filterbutton.
Since you are looking for an eCommerce theme, you can simply check the E-commerce option in the subject column. This way it’ll only show you eCommerce-compatible themes.
In the right-hand corner, type the theme name in the search bar. Once you’ve found the right theme, hover on its image and click the Install button. Then click Activate to change your website’s appearance.
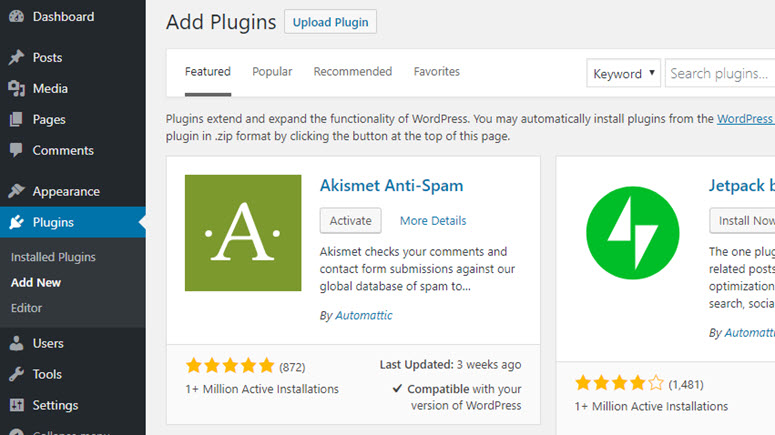
4.4. Extend Your Online Store With Plugins
WooCommerce supports tons of different addon plugins that let you enhance your online store without writing code or hiring a professional developer.
Just like WordPress themes, you can easily find and install free plugins from the WordPress plugin repository within your WordPress dashboard.
All you have to do is visit Plugins » Add New. Use the search box in the right corner to find a plugin and click the Install Now button. And then, click Activate.
Chapter 5: Getting Started with Your Online Store

WordPress is a fully-featured website builder solution that gives you endless possibilities to customize your site the way you want. Unlike other popular eCommerce solutions, WordPress makes it easy to integrate a blog with your online store and create standalone web pages.
If you’ve never used WordPress before, then we’ll walk you through how to kick start a fully-featured website along with your online store. Below are the things we’ll cover:
Add a blog to your online store Create standalone pages Add a navigation menu Add a widget Setup a static homepage
5.1. Add a Blog to Your Online Store
Do you want to help your eCommerce customers stay connected with your brand? Want to attract more website visitors, generate more sales and revenue? Then, you need to integrate a blog with your online store.
Every eCommerce business needs a blog. By integrating a blog with your store, you can update your brand’s news and stay connected with your customers. Keeping a regular blog is one of the best ways to drive organic traffic to your site as well.
Let’s take a look at how to create and publish a blog post in your WordPress website.
In the left-hand menu of your WordPress dashboard, you’ll find two similar options that may confuse you as a new user: Posts dan Pages.
Choose Posts if you want to create a website post that appears in reverse chronological order (newest first) on your WordPress website. Posts are also organized into categories and tags. You can read the difference between categories and tags for more information.
To create your first blog post, head over to your post editor by going to Posts » Add New. You need to start by adding a title for your blog post. After that, you can start writing your blog post content in the post editor. To upload images to your website, all you have to do is drag and drop your images to the text editor from your computer. Alternatively, you can use the Add Media button to upload your images and videos.
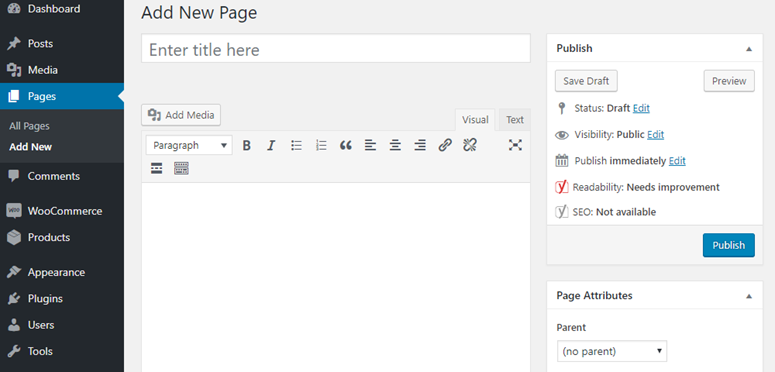
5.2. Create Standalone Pages
Just like a blog, you’ll also need to add standalone pages to your site such as an About us page, Contact page, Terms of Service page, etc.
Adding a page is almost similar to adding a blog post. The only difference is that you’ll need to visit Pages » Add New to create a new page. Once you’re done, click the Publish button to publish the page.
Your navigation menu sticks to the top of your website, so your visitors can easily find the most important pages and links.
To add a navigation menu, go to Appearance » Menus. You need to start by specifying a menu name in the Menu Name field and click Create Menu.
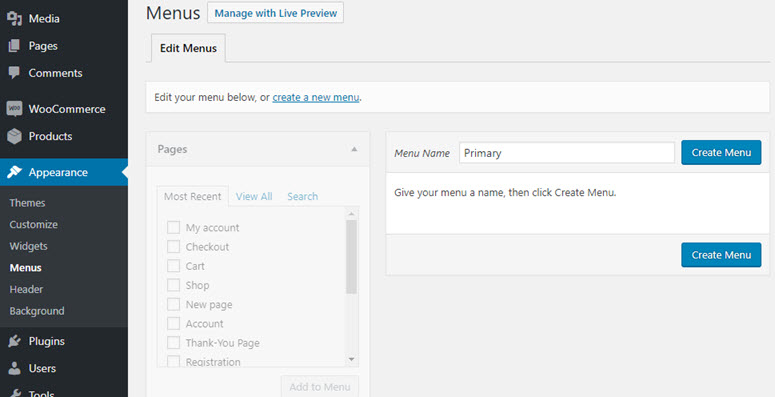
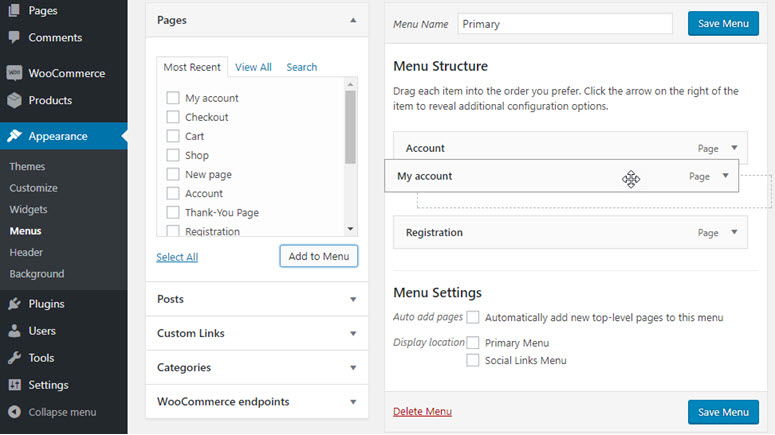
You can now choose from your existing pages, posts, custom links, and categories. After selecting, click Add to Menu. With drag and drop, you can position the menu’s structure. You can also use drag and drop to make nested dropdown menus. Once you’re done, select the display location and click Save Menu.
5.4. Add and Customize Your Widgets
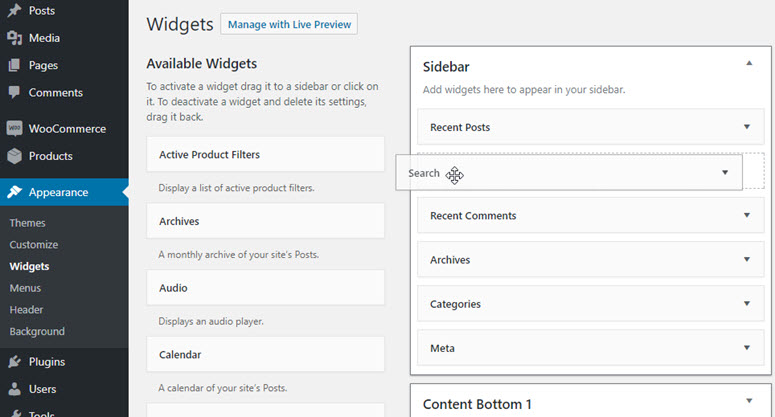
Within your WordPress website, you can easily add the right sidebar widgets per your preference.
Adding a widget is helpful if you want to display dynamic content in your sidebar such as social media buttons, facebook feeds, testimonials, etc. If your WordPress theme has support for footer widgets, then you can use it to add copyright notices, links, and more.
Go to Appearance » Widgets and select from the available widgets. Next, you need drag your choices to the widgetized area of your WordPress site.
5.5. Set Up a Static Homepage
By default, WordPress shows your blog’s latest posts as your homepage instead of a static page. If you want to set a custom static page as your homepage, then simply follow the steps below.
After creating a page, go to Settings » Reading. In the Your Homepage displays section, you’ll need to choose A static page and then select the page you want to display as your front page in the dropdown menu. Once you are done, click Save Changes.

Chapter 6: Extend Your Online Store

Expanding the core features of your WooCommerce store is as easy as installing plugins (apps). While every online store is unique in terms of the product lines, target audience, etc., there are some recommended plugins that almost every store will have to use, such as a contact form plugin, Google Analytics plugin, SEO plugin, and more.
Below are some recommended WordPress plugins that you’ll find useful for your online store:
Build contact forms with WPForms – Pro | Free Connect your site with Google Analytics using MonsterInsights – Pro | Free Improve your SEO with Yoast SEO – Pro | Free Add an extra layer of security with Sucuri Take a regular backup with Updraft Plus – Pro | Free Improve WordPress performance with W3 Total Cache Prevent spam comments with Akismet – Pro | Free Grow your subscribers and sales with OptinMonster
Since a detailed explanation about all the plugins would be overwhelming, we’ll explain just the four most important:
Enable customer tracking with MonterInsights Add online forms to your site with WPForms Improve your store’s SEO with Yoast Reduce shopping cart abandonment with OptinMonster
6.1. Enable Customer Tracking with MonsterInsights
Want to know how your customers interact with your site? Want to track the sales and revenue of your store?
Then, you need to enable eCommerce tracking with Google Analytics on your store. Google Analytics is the most comprehensive tracking tool for your website. It gives you detailed insights into how your visitors find your site and interact with your pages. Best of all, Google Analytics is absolutely free to use.
The default Google Analytics setup doesn’t allow you to track complex user interactions like eCommerce transactions, form submissions, file downloads, etc. This is where the MonsterInsights plugin come in. MonsterInsights makes Google Analytics easy for your website. With just a few clicks, you can track complex user activities, including eCommerce transactions.
Read the complete MonsterInsights review.
Let’s take a look at how to enable Google Analytics tracking on your site.
Head over to Plugins » Add New. Search for MonsterInsights and, when the plugin shows up, click Install Now and then, Activate.

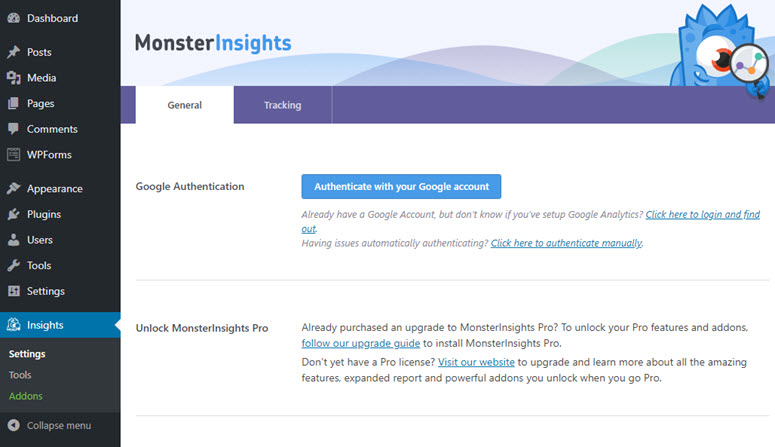
Head over to Insights » Settings to authenticate your site with Google Analytics. Click Authenticate with your Google account.
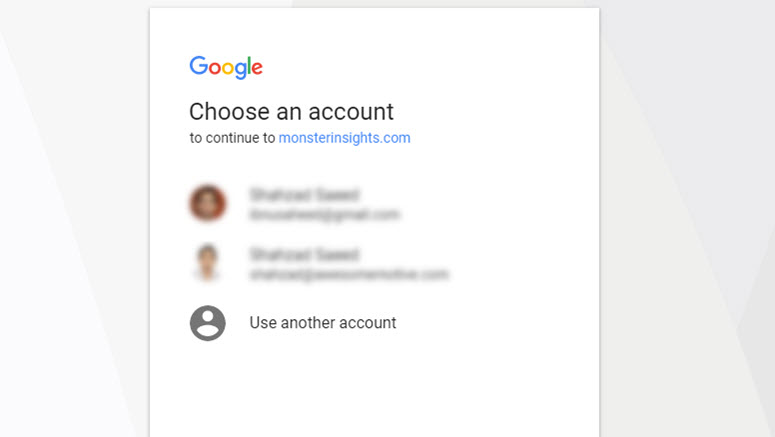
On the next screen, select your Google account.
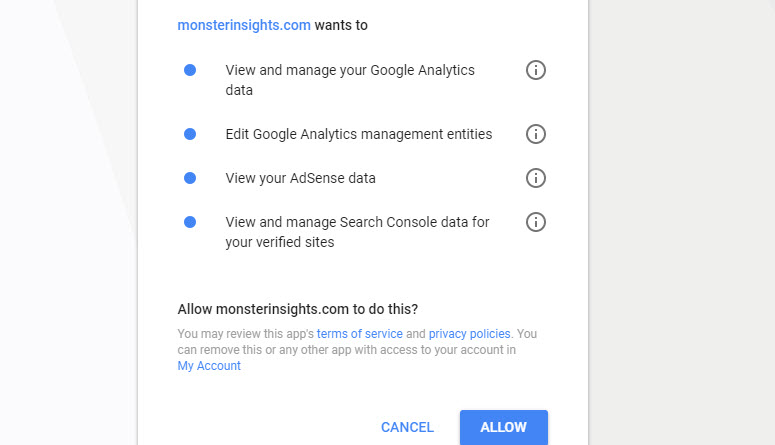
Next, allow MonsterInsights to manage your account.
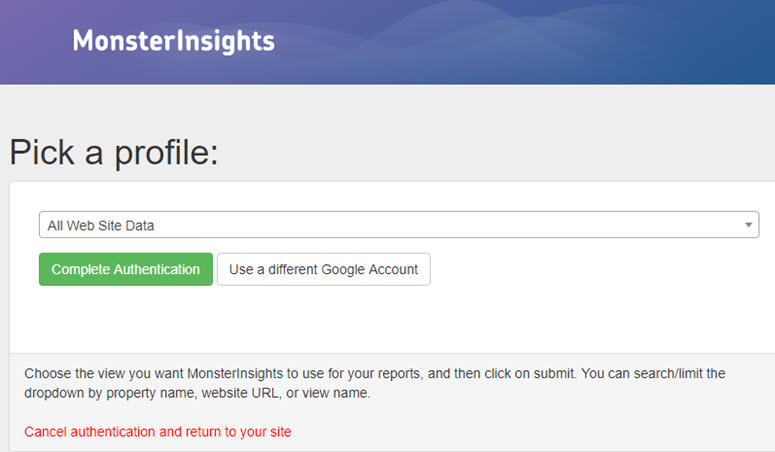
Finally, select the correct website profile for your site and click Complete Authentication.
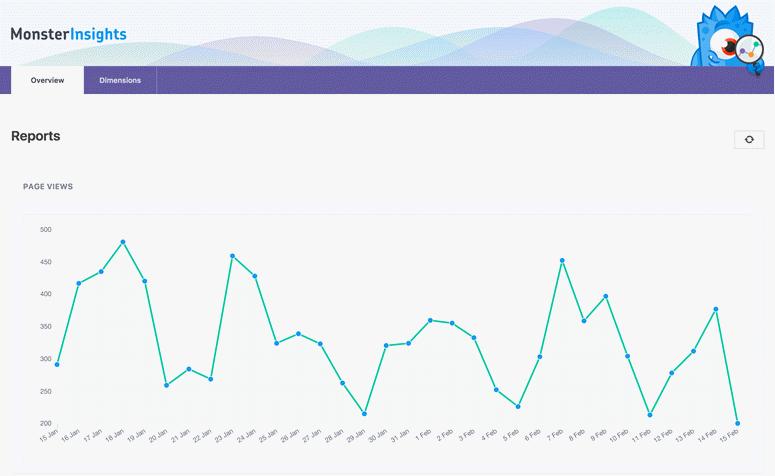
After authentication, you can easily find how your website is doing by visiting Insights » Reports.
eCommerce tracking is a pro feature of MonsterInsights. You’ll have to upgrade to MonsterInsights Pro untuk enable eCommerce tracking.
Get started with MonsterInsights today to easily set up Google Analytics on your site.
Want to start with the free version instead? Try MonsterInsights Lite.
6.2.Add Online Forms with WPForms
When you run an online store, you’ll need to build a lot of different online forms, such as contact forms, customer support forms, product review forms, survey forms, registration forms, custom login forms, etc.
The best way to create all the different type of forms for your site is by installing the WPForms plugin. WPForms makes it easy to create any type of forms on your site with its powerful drag and drop builder. Besides the ease of use, below are a few reasons why WPForms is the best WordPress form builder:
Tons of built-in form templates: The plugin is bundled with tons of useful pre-made form templates, so you don’t have to create every form from scratch. With their Templates Pack addon, you get a huge variety of pre-built templates for every niche and industry. Integrations with your favorite apps: WPForms seamlessly integrate with your email marketing services and other third-party apps you use. Custom registration and login forms: Have a consistent branding throughout your site including your registration and login forms. And a lot more…
Read the complete WPForms review.
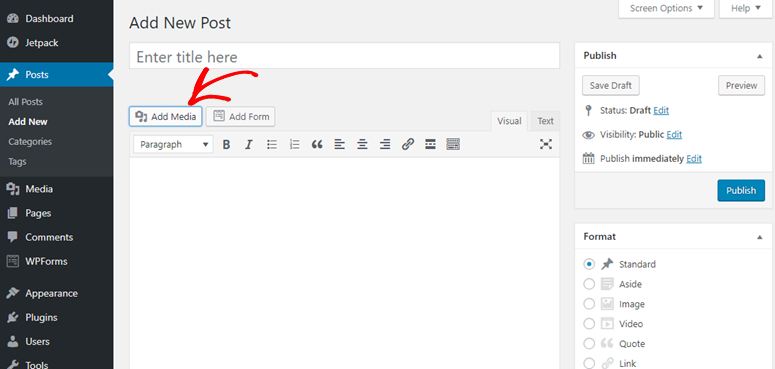
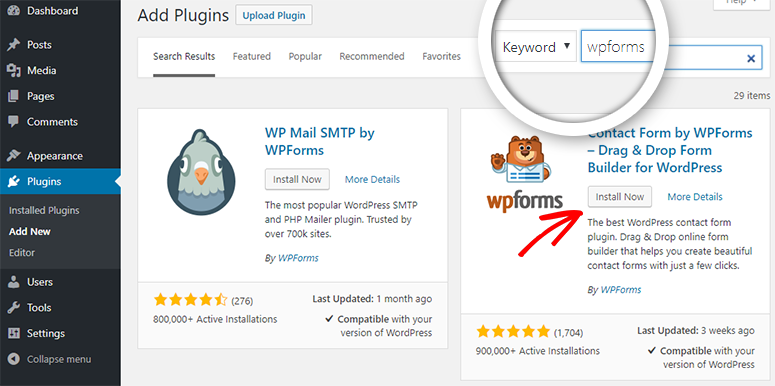
To create a form on your blog, first off, you’ll have to install WPForms by navigating to Plugins » Add New. Search for the WPForms plugin and, when it shows up, click Install Now, and then Activate.
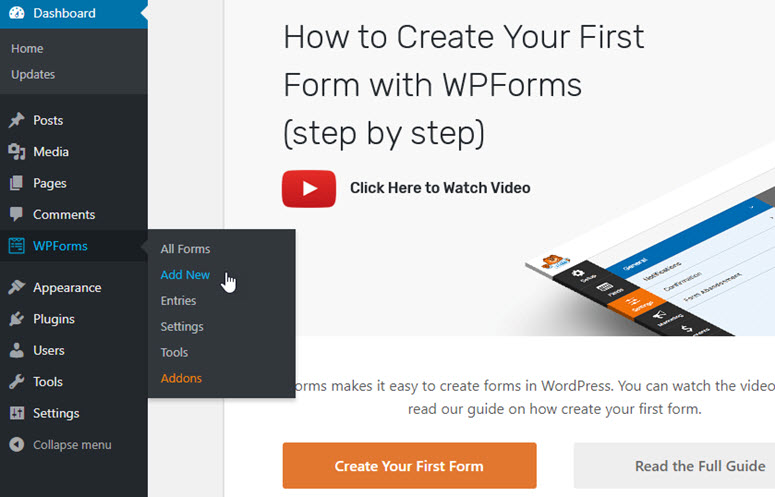
You’ll now be directed to the beautiful welcome page of WPForms. You can either click the Create Your First Form button or click WPForms » Add New to create your first form.
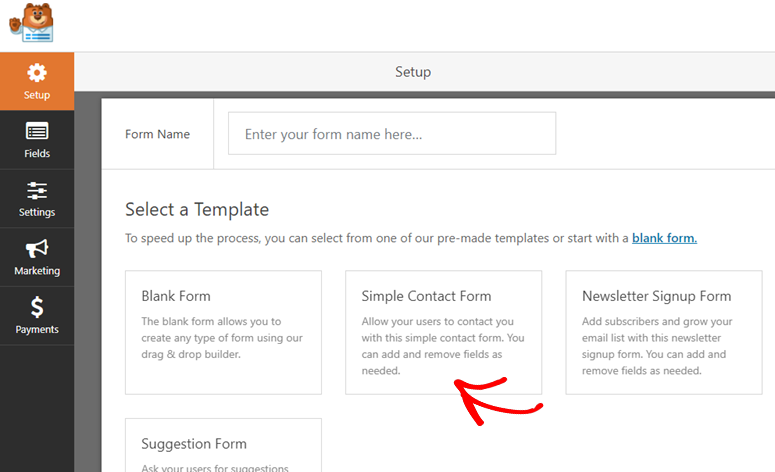
Next, you’ll be prompted to choose a template. You can select one of the premade templates or start with a blank form. If you want, you can give a custom name to your first contact form.
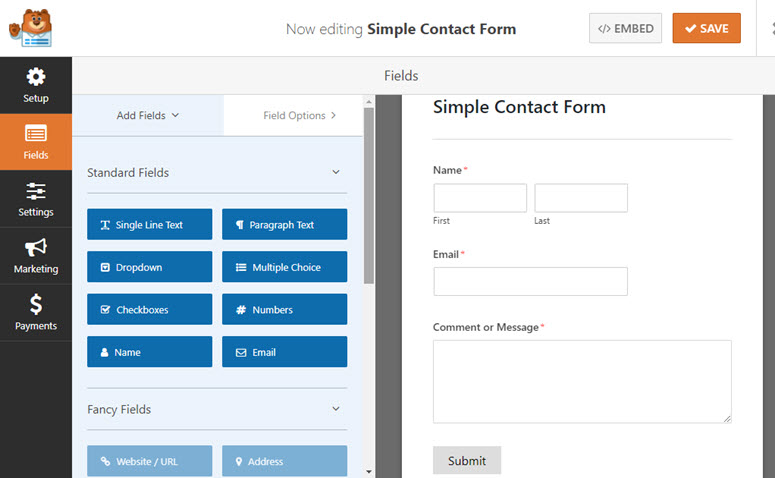
WPForms makes it easy to build a form with drag and drop. Click on the appropriate form fields in the left panel to add them to your form. You can also easily re-arrange them and even remove any unnecessary fields with ease. After making the necessary changes click Save.
To add a form on your site, simply go to your post or page editor and click the Add Form button above the text editor.

Select the right form you want to publish and then click Add Form and then, click Publish.
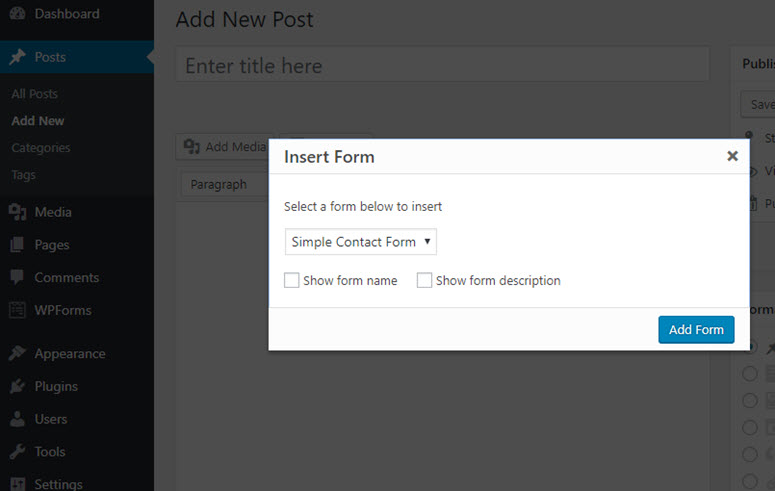
Itu dia! You’ve now successfully published a contact form.
Want to create a contact form the easy way? Then, get started with WPForms today.
Want to start with the free version instead? Try WPForms Lite.
6.3. Improve Your Store’s SEO with Yoast
Do you want to expand the reach of your products? Do you want to drive more targeted traffic from search engines that are likely to purchase your products?
Then you’ll essentially need to improve your SEO. The best way to improve the SEO of your online store is installing an SEO plugin like Yoast SEO.
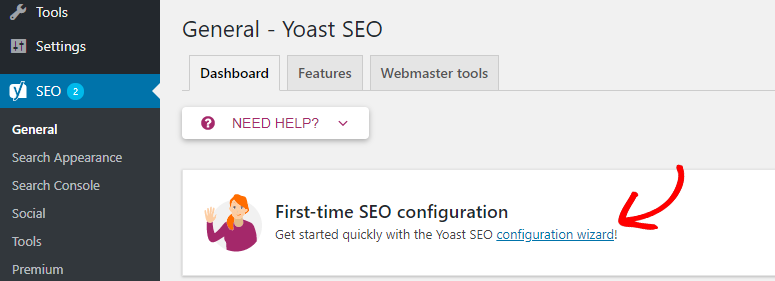
In your WordPress dashboard, go to Plugins » Add New. Search for Yoast in the search bar that you can find in the top right-hand corner. The Yoast SEO plugin will now have appeared on your page. Click Install lalu Activate.

In your WordPress dashboard, you can now find the SEO menu in the left-hand menu. Simply click on it.
If the plugin detects any SEO errors, then you can fix them by following the suggestions provided.
Setting up Yoast SEO is easy using the configuration wizard. Simply click on the configuration wizard to get started.
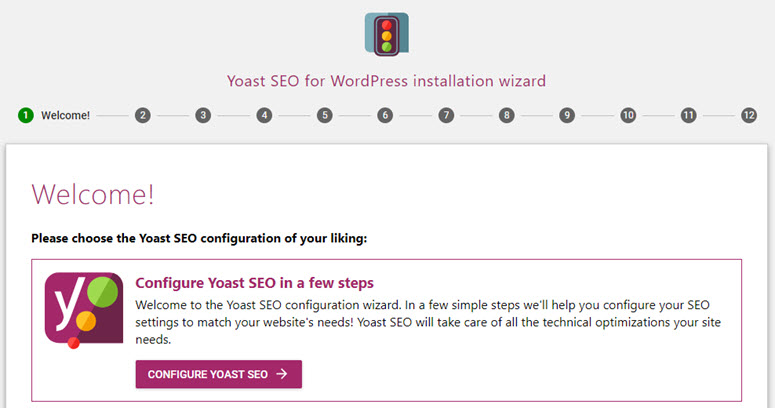
In the first step, you’ll be asked whether you want to configure Yoast SEO yourself or hire an expert to do it for you. Select CONFIGURE YOAST SEO to do it yourself.
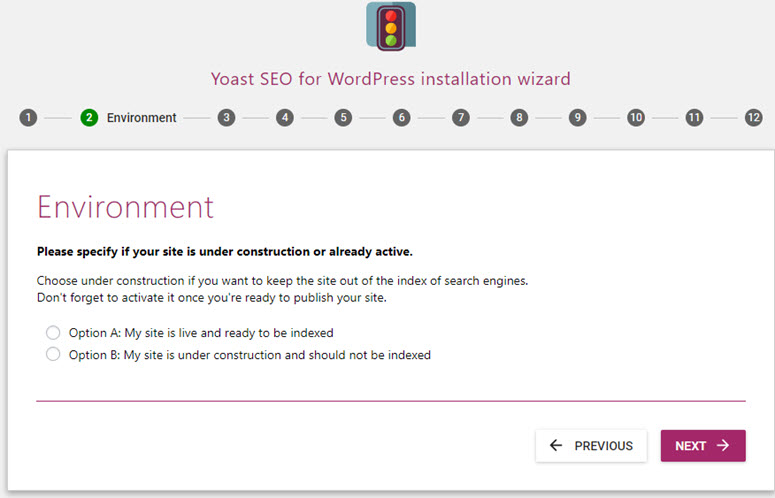
In the next step, you’ll be asked whether your site is ready to be indexed. You can choose option A. Then, click Next.
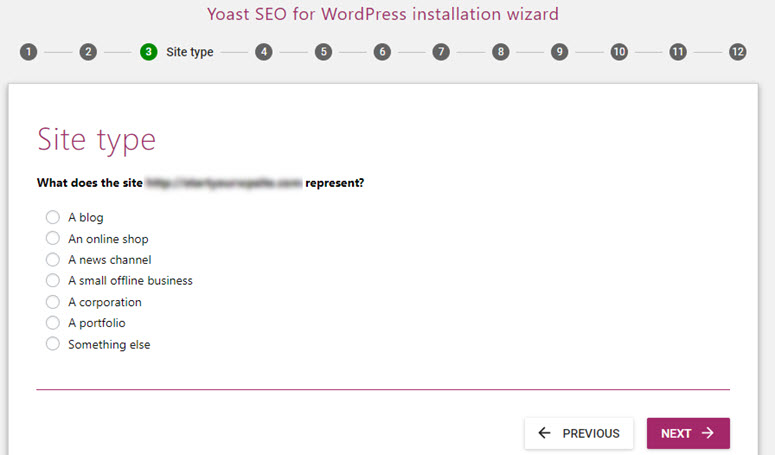
Next, you need to choose your website type. In this case, you want to select – An online shop. Then, click Next.
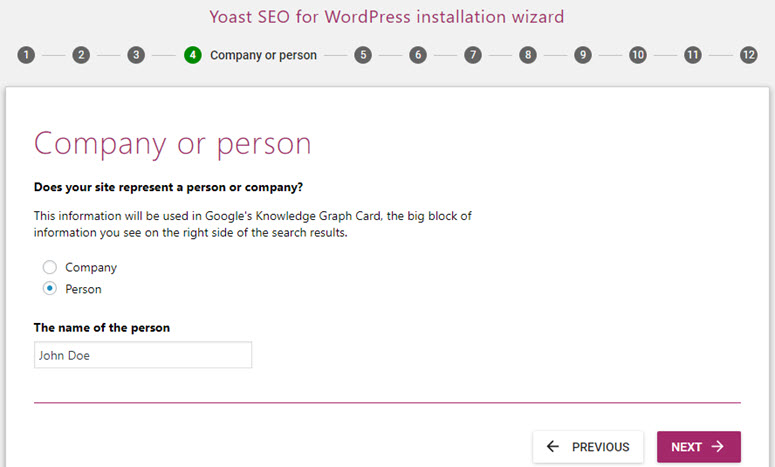
For Google’s knowledge graph card, you’ll be asked whether the website is run by a person or a brand. If Person is selected, then you’ll have to specify the name of the person. If Company is selected, then you’ll have to add the logo as well. Then, click Next.
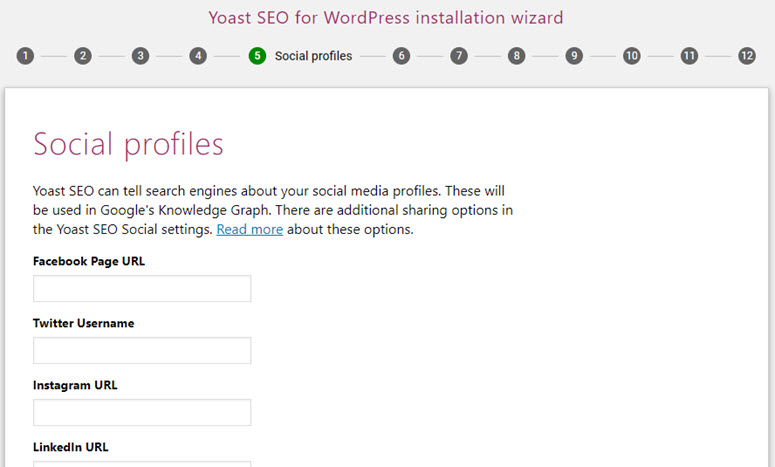
You can now enter your social media profile URLs in their appropriate fields. Then, click Next.
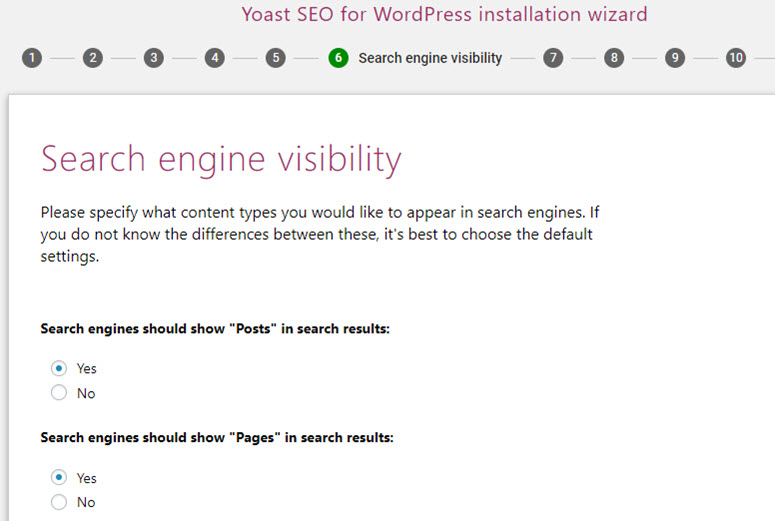
In the Search engine visibility step, you don’t have to change the default settings because they’re set up to index your posts and pages. Simply click Next.
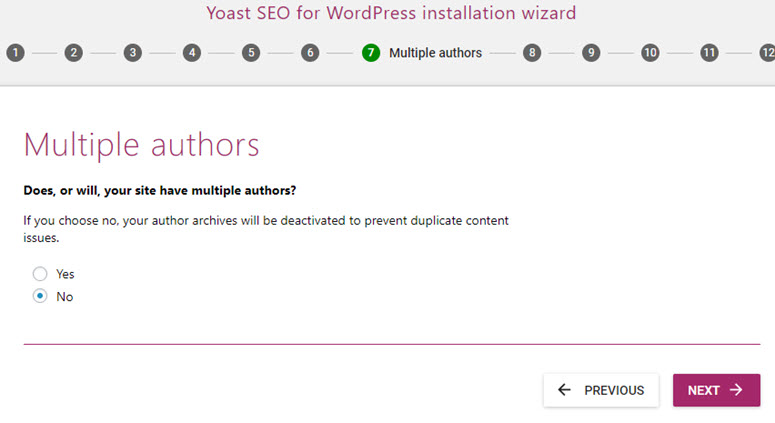
Author archives might create duplicate content issue for search engines. To prevent it, you can disable it if your blog doesn’t have multiple authors.
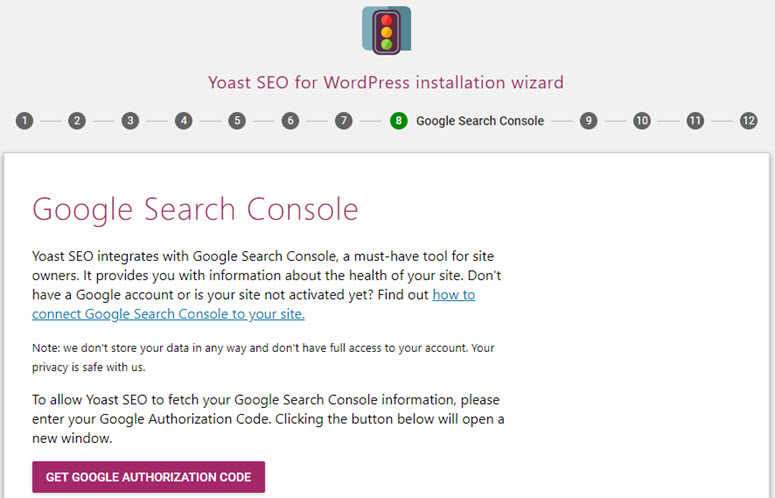
Next, you’ll be prompted to connect your website to Google Search Console, which is a free tool that gives you detailed insights into how your blog content is being perceived by Google.
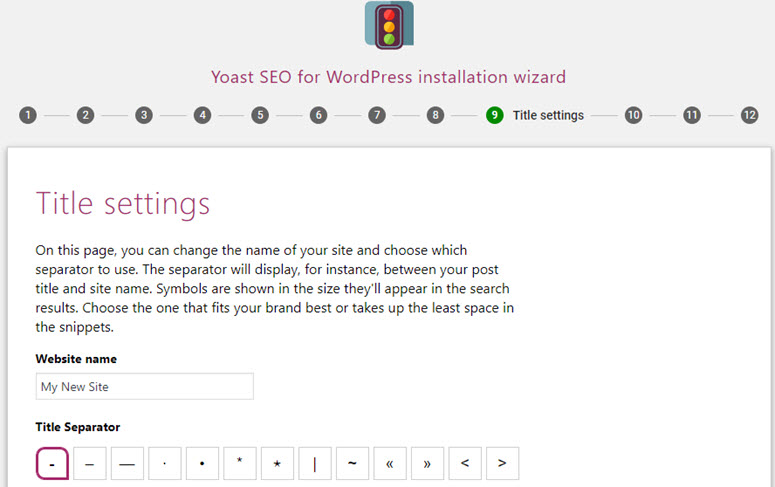
Next, you can set up the title for your blog, and then, click Next.
You can now exit the configuration wizard because the other steps were created for promotional purposes such as signing up for Yoast’s newsletter.
Get started with Yoast SEO today to improve your store’s SEO.
Want to start with the free version instead? Try the free Yoast SEO.
6.4. Reduce Shopping Cart Abandonment with OptinMonster
Did you know the average online shopping cart abandonment rate is around 70%? That means only 3 out of 10 customers are completing the checkout.
Evidently, shopping cart abandonment is the single largest obstacle for eCommerce business to overcome. But, you can reduce shopping cart abandonment with a plugin like OptinMonster.
OptinMonster is a popular lead generation tool that allows you to display targeted popups that convert abandoning visitors into subscribers.
For instance, when a customer is about to leave your site before completing the checkout, you can prompt them to complete it with a targeted popup campaign. You can use OptinMonster’s exit intent technology to display a targeted campaign.
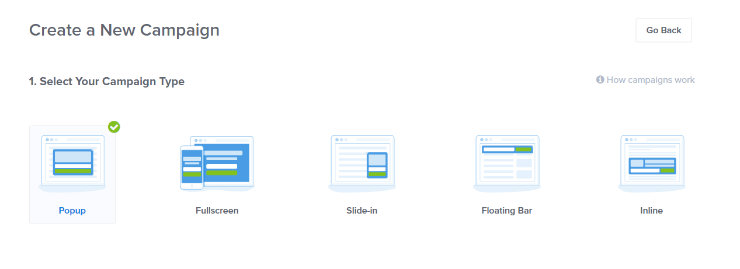
To create a targeted exit-intent popup campaign, first create an account with OptinMonster on their official website. Once you’ve signed up for an account, you can start creating your first exit-intent popup campaign to reduce cart abandonment. First, click on the green Create Campaign.

Next, choose the campaign type by clicking on Popup.
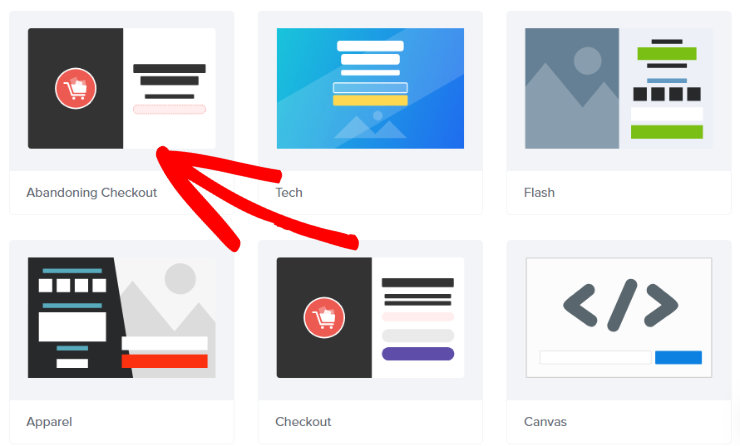
After that, you’ll be prompted to choose a pre-designed template for your campaign. OptinMonster has a pre-built template specifically for shopping cart abandonment, so let’s choose that one, titled Abandoning Checkout. Hover over the template and click the Use Template button.
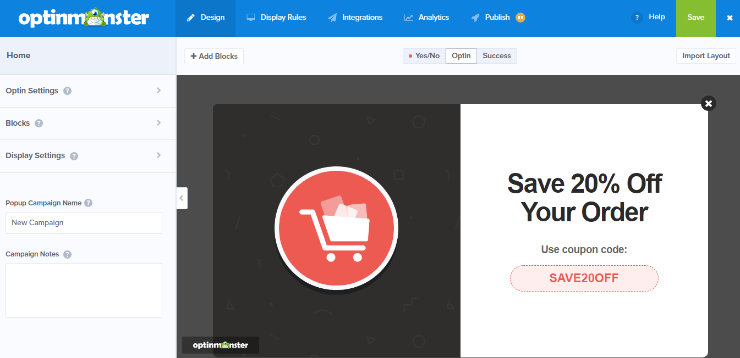
After clicking the Use Template button, you’ll be prompted to name your campaign and choose which website your popup will go on. Then, click the Start Building button to continue.
You’ll then be taken to the Campaign Builder. In this area, you can begin customizing your campaign to make it your own. You can change the colors, add your own image and text, and more.
When you’re happy with the way your popup looks, it’s time to set the display rules. Click on the Display Rules tab at the top of the screen. Then in the dropdown menu, choose exit detected. You can also choose the level of sensitivity of the exit-intent to be low, medium, or high.
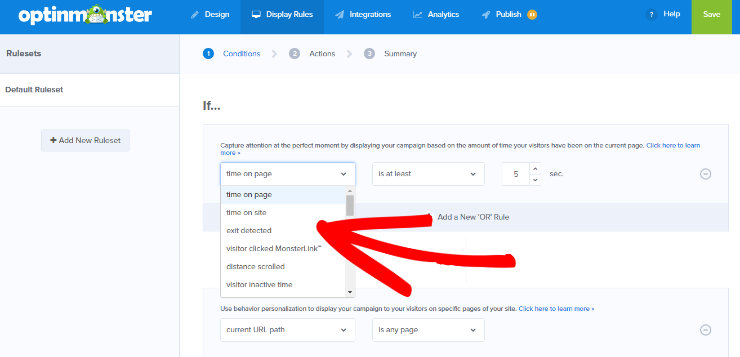
You can also add other rules such as only showing the popup to users who have visited your checkout page as well. Play around with the rules to see what works best for you.
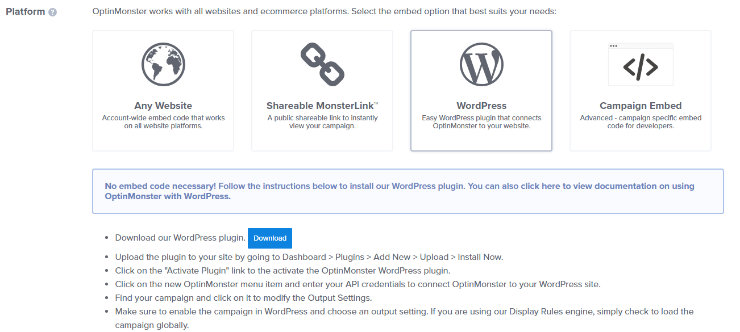
After designing your campaign, setting the display rules and making sure your campaign is connected to your email marketing service, hit the green Save button, then click on Publish.
From here, toggle your campaign to Live dalam Status section.

In the platform section, select WordPress, and follow the simple instructions to embed the campaign on your website.
Now instead of losing precious sales, you’ll be able to convert those abandoning visitors into happy customers.
Some other ways to reduce shopping cart abandonment include adding security badges to your site and offering guest checkout. Adding a security badge helps instill confidence in your customers and guest checkout makes it easy for your customers to complete an order, so they don’t have to create an account.
Chapter 7: Adding Your First Products
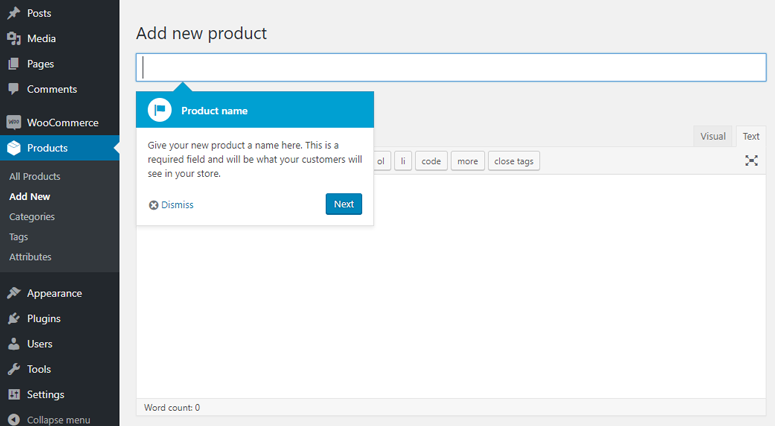
You can now start listing your products in your store by clicking the Create a Product button. This will direct you to the Products editor in your dashboard. Adding a product in your WooCommerce store is easy.
Just like creating a page or post, you’ll need to add product details like title, product description, product categories, product tags, product image and gallery by navigating to Products » Add New.
Just below the text editor, you can find a product data box where you can specify the product specific details like:
Regular and sale price Manage inventory Shipping details like weight and dimensions Product upselling and cross selling details And more…
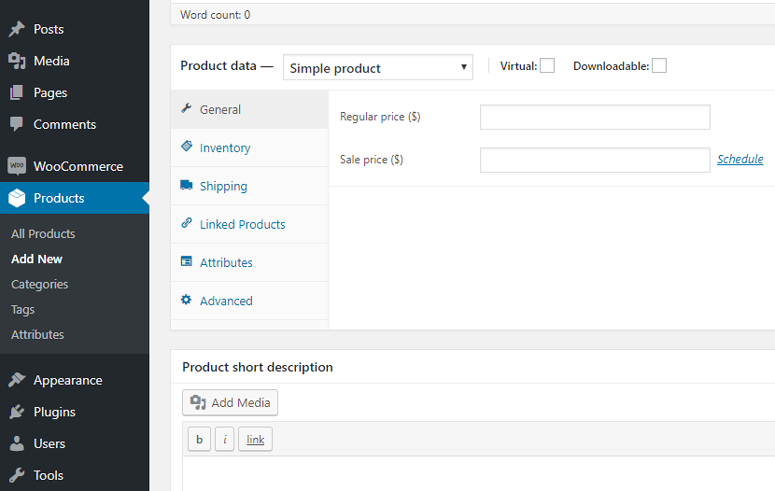
You will also find a short description box which is used when there are multiple products on a page.
Chapter 8: Before-Launch Checklist

Now that your online store is nearly completed, before you go live, you need to make sure you have everything in order. Launching your online store before it’s ready can cause problems for you and can even drive away your potential customers.
So, here’s a before-launch checklist that includes every step you should cross off your to-do list. Be sure to complete each of these steps before launching your online store to the world.
Build Your Online Store – Build your online store and make sure everything looks perfect for your future customers. Be sure you have all the pages you need such as product pages, about page, contact page. As an online store you also need a shopping cart and checkout page. Prep with a Coming Soon Page – Get your audience excited about your online store before it’s even launched by adding a coming soon page to your site. You can easily do this using a WordPress coming soon plugin Suka SeedProd. Add Your Products – Add all of your products to your online store. This includes high-quality images, product descriptions, prices, etc. Optimize Your Images – Online stores are image-heavy which can slow down your site. Be sure to optimize your images using an image optimization plugin like reSmush.it. Adjust Your Tax and Shipping Settings – Double check your tax and shipping settings to make sure you’re charging the right price for the products you’re selling. Test for Mobile – Many consumers do their online shopping from their mobile devices, so make sure your online store is mobile-friendly. Test the Performance of Your Site – Test the speed and performance of your online store to make sure it’s optimized for shoppers. You can use our free Website Speed Test Tool to test your site and get suggestions for improvements. Install Analytics – Create a Google Analytics account and use MonsterInsights to track your website data. Test to make sure it’s tracking accurately before launching your online store. Optimize Your Site for SEO – Install a plugin like Yoast SEO in order to optimize your website for SEO. Set up Email Marketing – You’ll need to email your customers and vice versa, so make sure to set up your email marketing. You should also start growing your email list with a lead generation tool like OptinMonster. Place a Test Order – Make sure your shoppers can buy products from your store successfully by placing a test order using your payment gateway. You can refund the order right after confirming it works. Market Your Online Store – Start marketing your online store to drive more shoppers to your eCommerce website. For instance, start promoting your online store on social media and start blogging.

If you’re an eCommerce merchant, your ultimate goal should be to grow your sales and revenue. There are many different ways to generate more sales on your online store. Let’s take a look at a few of them below:
Drive targeted traffic. Turn your visitors into leads and customers by building an email list. Resources to learn and master WordPress and WooCommerce.
9.1. Drive targeted traffic
Driving more traffic is the lifeblood of any online business, but keep in mind that more traffic doesn’t always equate to more sales. You need to ensure that you’re attracting targeted traffic who’s interested in your products.
A couple of ways to drive more targeted traffic to your site are:
SEO: Improve your SEO and help your potential customers discover your products on Google and other search engines. Paid ads: SEO can be time consuming, so if you want a quick solution to drive targeted traffic, then you might want to spend your marketing dollars on paid ads. Affiliate program: Start an affiliate program and encourage people to promote your products to earn referral revenue.
9.2. Build and Grow Your Email List
One of the reasons you’re not turning your visitors into customers is that you don’t have a relationship with them. Your customers don’t know you, so they’re afraid to make a purchase from your store.
Building an email list is the best way to start and foster relationships with your potential customers.
Building an email list helps you qualify your leads, build a longlasting connection with them, and ultimately, helps you turn your visitors into leads and customers. Faktanya, according to a survey, email has an ROI of around 4,300%, so if you’re not taking your list seriously, then you’ll fall behind quickly.
With OptinMonster, you can skyrocket your email list by showing targeted list building campaigns by detecting their individual user behavior.
9.3. Learn and Master WordPress and WooCommerce
To be able to run a successful online store, it’s imperative to learn and master WordPress and WooCommerce.
Below are a few resources you’ll find helpful.
OptinMonster blog: OptinMonster blog is a go-to resource on the web for all things online marketing and conversion rate optimization. IsItWP: At IsItWP, we regularly publish WordPress tutorials, WordPress theme and plugin roundups, reviews, WordPress deals and a lot more. WPBeginner: WPBeginner is the largest free WordPress resource on the web for WordPress beginners. They regularly publish useful tutorials, videos, coupon codes for WordPress products and a lot more. WPForms blog: If you want to read tutorials that help you grow your business using the WordPress platform, you need to follow the WPForms blog. You can also find tips and recommended practices to build any types of online WordPress forms. MonsterInsights blog: The MonsterInsights blog is an excellent resource you can follow to get a handle on Google Analytics best practices and recommendations. You can find a lot of WooCommerce specific articles including setting up enhanced eCommerce tracking, individual customer tracking, etc. for WooCommerce.
Chapter 10: FAQs

Having helped many users set up their online stores with WordPress + WooCommerce, we’ve found that people often ask the same sort of questions again and again. This is why we’ve compiled a list of frequently asked questions, so you can easily launch your online store without hassle.
When should a business start creating an online store?
As online sales are rapidly growing, having an online store gives you a huge advantage over your competitors.
If you want to expand your business online and grow your revenue, then you should launch an online store as soon as possible.
How much does it cost to start an online store?
To start an online store powered by WooCommerce, you’ll have to purchase a domain name for $14.99 per year and a hosting account, which costs around $7.99 per month. Altogether, starting a site will cost you as low as $110.87 annually.
Can I start an online store without purchasing a hosting account?
No. Every website needs a hosting account. You can find several eCommerce platforms that allow you to build an online store with a premium subscription which includes hosting as part of it.
Can I start an online store without WordPress/WooCommerce?
Yes, there are a lot of eCommerce platforms that let you build an online store easily. However, the main thing that sets WooCommerce apart from the competition is its ease of use. WooCommerce works on top of WordPress, the world’s most popular website building platform. That means the interface will be familiar if you’ve ever used WordPress before.
Another benefit is that, unlike other self-hosted eCommerce platforms, WooCommerce doesn’t require you to go through a tedious installation process. In fact, most web host providers, including Bluehost supports WooCommerce hosting, so you can quickly get your online store up and running without any software installation or manual setup on your end.
How do I add a blog to my online store?
Adding a blog to your WooCommerce-powered store is easy. All you have to do is to create articles by navigating to Posts » Add New, and publish them by clicking the Publish button.
In addition, make sure to add a link to your blog in your navigation menu so your visitors can easily discover it.
How do I make my products Google searchable?
If you want your potential users to discover your product on Google, then you’ll need to improve your SEO (search engine optimization). SEO is the practice of increasing your website traffic from search engines by getting your web pages to rank higher in search engine results.
How can I learn more about WordPress terminologies?
Refer to this WordPress Glossary Terms for Beginners whenever you’re puzzled by strange WordPress terms or abbreviations.
What payment methods are supported on WooCommerce?
By default, WooCommerce allows you to accept payments via PayPal. To add more payment gateways to your store, simplify the find the right WooCommerce addon and install it on your store. You can use credit cards via Stripe, Authorize.net, Braintree, and several other gateways. You can also accept bank transfers, bitcoins, and more.
How do I manage shipping in WooCommerce?
WooCommerce supports a few shipping options:
Free Shipping Flat Rate Shipping International Shipping Local Delivery / Local Pickup
If you’re selling a lot of products, then you can install a shipping addon like FedEx Shipping Method. This way you don’t have to worry about shipping the orders your customers’ make, giving you a peace of mind.
How do I drive traffic to my online store?
Some ways to drive traffic to your online store are:
Search engine optimization Drive social media traffic Invest in online ads
We hope this article helped you create an online store with WooCommerce.


